As Valentine’s Day rapidly approaches, I find myself in a bit of a pickle. I want to decorate our home for the holiday, but alas I have no suitable decor. Yes, you read that right– there’s nary a heart shaped, love-related decoration around.
I struggle with Valentine’s decor because often the things I see, although cute, just do not go with the style of our house. I’m not a huge fan of the bold red/hot pink color scheme nor the glitter that frequently accompanies many of the tutorials I’ve seen (perhaps this will change when we’ve got some rugrats running around). I’m quite persnickety, and thus the one to blame for my void of Valentine’s decorations.
With that said, I was over the moon when I saw this craft at findingHome. I love the simplicity of it and its overall natural look. I viewed the tutorial but tweaked my product (I used a thicker jute because I wanted it chunkier) & process (I couldn’t find a paper punch or stamping plate).
Here’s my finished product:
Here’s what you need:
- One canvas (I got my 9 x12 canvas at Hobby Lobby)
- Jute (or twine as the original tutorial suggests)
- Print out of the word of your choice
- A few pieces of tape
- Sharp tool to poke through the canvas
- Yarn needle
Step 1:
Decide where you want your word to go on the canvas. I placed mine just above the exact middle of the canvas. Tape your print out to the canvas– make sure the paper is taut.
Step 2:
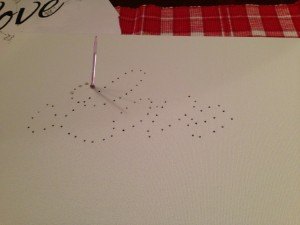
Using your sharp tool, begin to poke holes along the shape of your word. I placed my left hand under the canvas and pushed slightly upwards as I used my right hand to poke the tool through. Having my left hand under the canvas ensured that the canvas did not stretch or tear as I poked through.
You can see that I didn’t make my holes perfectly even. I left bigger gaps between the holes in which I knew the jute was going to be on top of the canvas, and made smaller gaps for holes in which the jute would be on the back side of the canvas. Doing this ensured less ‘white space’ between my jute.
Step 3:
Take the print out off of the canvas. Depending on the size of your jute (twine, yarn, whatever you choose), you may need to go back with your sharp tool and stretch the holes a teeny bit bigger. Make sure your holes are big enough for your needle to fit through! I went for a snug fit.
Step 4:
Thread your jute through the needle. Start behind the canvas and come up through the first hole. I decided to start at the top of the L. Thread your jute above/below the canvas. Be sure to always have your fingers/hand pushing in the opposite direction of the needle. (When you are pushing the needle down through the canvas, have your left hand behind the canvas pushing up ever so slightly) Again, this was my precaution to keep the canvas from tearing.
Step 5:
Continue your embroidery for each letter. When finished, you can knot it on the back. My string was tight in the holes, so I didn’t even need to make knots to hold it in place. I’m very pleased with how this turned out, now I just need to find a home for it!


