Burlap Coffee Bag Tote

Have you ever made/bought a gift for someone, but you had the hardest time giving it away because you loved it so much yourself? This Burlap Coffee Bag Tote I am about to show you was one of those gifts. 

Remember when BurlapFabric.com generously gifted us the motherload of burlap materials? No? Read about it here. Since our magical box of burlap has arrived, Rona, Lisa, and I have been busy with burlap, and if you know me/read my posts, I freakin’ love burlap. Anyway, in our shipment of burlap, we requested these awesome used (they are authentic, for I found some rogue coffee beans in my bag) burlap coffee bags. 

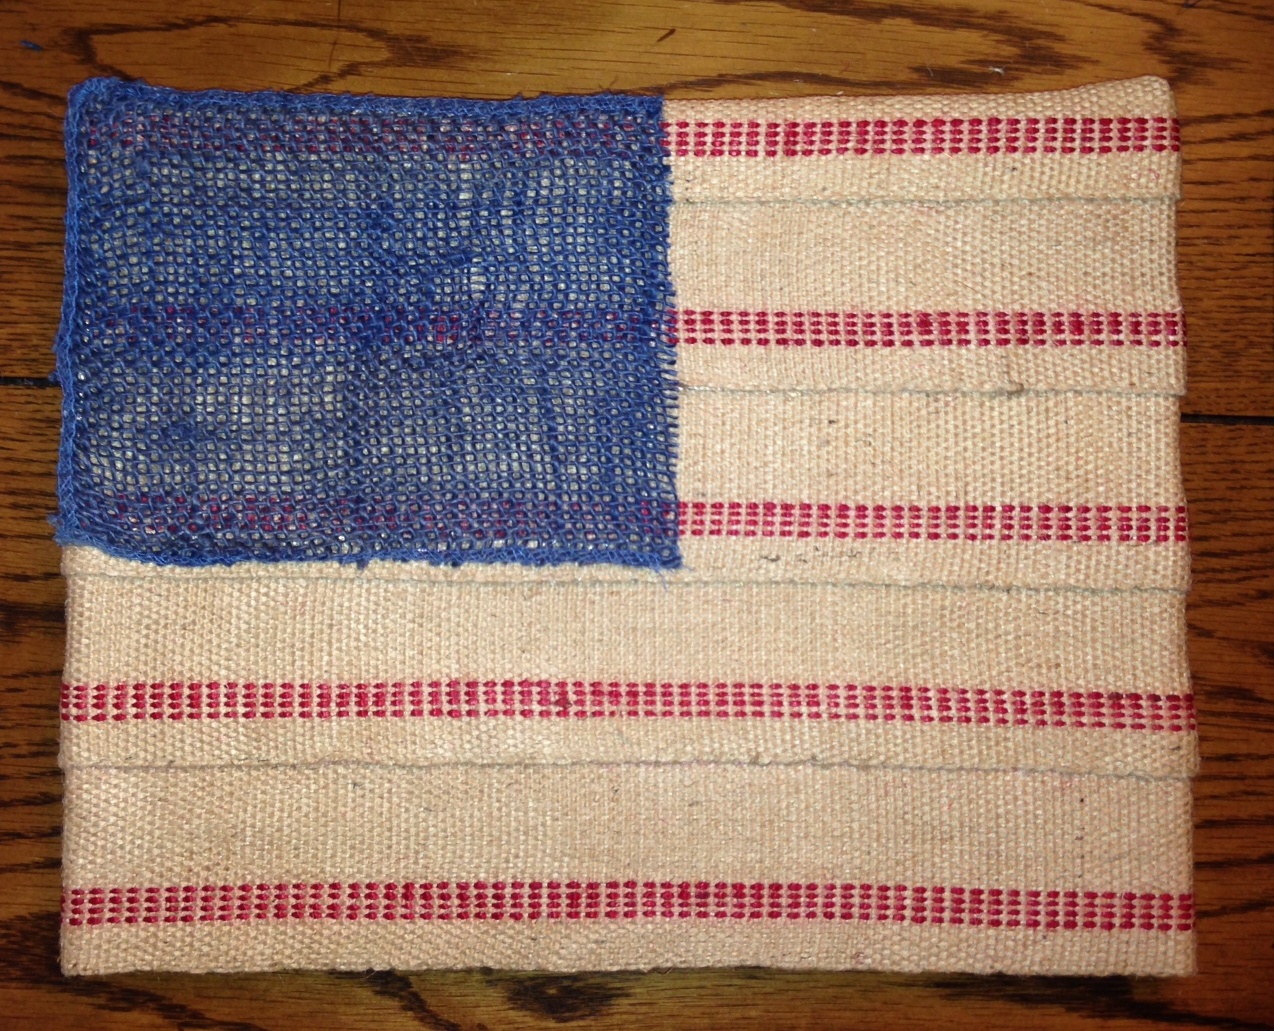
For my first coffee bag craft, I knew I wanted to make a tote bag out of the coffee bag and use the jute webbing as its straps. 

I won’t lie to  you all, though. Because this project involved sewing, no pattern, and me, I enlisted the help of my mom (thanks, Mom, you’re the tops!) AND a lot of time (an entire Sunday with some interruptions and supercute distractions)

Because this burlap coffee bag tote was made with love, care, and trial and error, unfortunately I do not have my usual step-by-step instructions. If you know your way around a sewing machine, you can use my mom and my bag and general steps to help you construct yours. However, stay tuned, as both my mom and I loved this bag so much that I am sure that we will be making more, and then we will have an actual pattern. Sorry to disappoint!

Coffee Bag Tote Collage


Here’s a quick run-down of what we did.

1. Decide your desired size for the tote. Because I was trying to use the existing stitching, I had to sacrifice some of the print on the bag, which at first was a total bummer. 

Burlap Coffee Bag Tote IMG_4889

2. Choose and measure the size you would like the base of your bag to be and pin and then sew. 

IMG_4907

3. Find something sturdy/flexible for the base/bottom of your bag. We looked at the construction of a lot of bags, and found that the bags we liked had some structure in the base.  For this I used a placemat, and I cut it to size. 

Coffee Burlap Bag Tote

4. I wanted a shape to my bag (squarish), so we folded a triangle off the ends of the base of the bag. We reinforced the base of the triangle by sewing it, and then we tacked it up the sides of the bag. 

Burlap Coffee Bag Tote

Burlap Coffee Bag Tote5. Line the inside of the bag with burlap  or any other fabric. 

IMG_49476. Add straps. I decided that I did not want my straps to go around my bag. We reinforced the straps at their base with an “X”

7. Add a pocket liner. I love pockets in a bag, otherwise it becomes a black hole for my things. To make this easy, I suggested that we just fold the fabric up 3/4 of the way and make the pockets that way. 

IMG_4966

8. Sew pocket liner in.

9. Add some structure to the top of the bag at all four corners by pinching the corners and sewing. 

IMG_4986Would this not make the best beach bag? Or tote for school? Or tote for a weekend away? Or….

And for your entertainment,  I did take an awkward photoshoot with it. Proof that the bag is cute, but that I take some horrible pictures. 

IMG_4989 IMG_5027

Burlap Coffee Bag Tote

I do not even know– I guess I won’t be doing any posts on how to take the perfect picture!

You’re welcome (or not) for that last pic : )


Drink Up-DIY Sharpie coffee mug

I’m sure you’ve seen these DIY Sharpie coffee mugs on Pinterest. I’ve been dying to try it myself. I finally had the chance to tackle this DIY for my mother-in-law’s 60th birthday last week.

DIY Sharpie Mug 1

Materials:

  • White mug
  • Pencil
  • Sharpies (fine and regular tip)
  • Stencil/letter stickers (optional)

DSC02170

Step 1:

Thoroughly clean the mug and wipe it with rubbing alcohol. Let it dry completely.

Step 2:

Use a pencil, sketch or stencil on the design. I decided to use a pencil first to map out size and position. If you are brave, skip this step and go straight to Sharpie. Also double check your math to make sure the numbers add up if you are using a similar design. :)

DIY Sharpie Mug 2

Step 3:

Outline the design with a fine tip Sharpie. I traced over the letters from right to left to avoid smudges. Erase any pencil marks with a napkin. A damp napkin will allow you to wipe off the Sharpie.

DIY Sharpie Mug 3

* For the back of the mug, I dotted around the “b”. Holding the Sharpie at an angle will give you ovals. If you want perfect circular dots, hold the Sharpie perpendicular to the mug.

Step 4:

Set the mug aside to cure for 24 hours.

Step 5:

Bake at 375 degrees for 35 minutes. The following tip is for my husband. Be sure to put the mug in a cold oven and let it warm up along with the oven. Do not preheat.

DIY Sharpie Mug 4

 Easy right? I’m itching to make more of these. I think Santa may leave one for each one in the family. ;) Have you made these before? What pins have you been dying to try?

Burlap Webbing American Flag

When I first saw the red ticked burlap webbing that we received from burlapfabric.com, I immediately thought of two things: Christmas and American Flag. Since it’s a bit early for Christmas crafts, I’m going to share the Burlap Webbing American Flag that I envisioned and was (happily) able to create.

I knew the webbing would be a great fit for a rustic style American Flag—perfect for our home décor.

 Burlap Webbing American Flag

What you need:

Canvas (I suppose you could use wood too)

Red Ticked Burlap Webbing

Blue Burlap Garland (found in floral section of craft store) – or any leftover blue fabric you may have

Hot Glue Gun

Scissors

Optional- something for stars

Burlap Webbing American Flag

Step 1:

Cut your strips down to size so they fit your canvas. I chose to wrap my strips around the sides of my canvas so the white edges weren’t exposed. I did not wrap the bottom, as it will be leaning on a table or shelf, but I did choose to wrap the top. In total I needed 5 strips.

I also cut out a rectangle from my blue burlap garland to serve as the blue part of my flag.

Step 2:

Layout your strips next to your canvas. As you can see, the strips are quite a bit taller than the canvas, so you have to decide how you want to layer them in order for everything to fit on the canvas.

I wasn’t crazy about the uneven spacing between the red lines and burlap color, so I decided to layer my strips to hide the top red line on each piece of webbing. This would give me nice even red/burlap spaces.

Burlap Webbing American Flag

Step 3:

Fire up that glue gun and get to work. With each strip, I glued the left side of the canvas and simply worked my way to the right, again adhering it to the side of the canvas.

You can see how I cover the top red line on each piece of webbing in the photos below.

Burlap Webbing American Flag

Step 4:

Grab your blue burlap rectangle and glue it to your flag. Since the blue burlap had bigger spaces/was more see through, I was worried that gluing the entire rectangle down would show through to the surface. Therefore, I chose to glue down just the edges of the blue fabric—it stays on there just fine.

Burlap Webbing American Flag

Step 5:

Decision making time- stars or no stars? At the moment I have no stars on my flag and I think I will keep it that way. Reason 1: I like the simplicity of the flag without the stars

Reason 2: I made several attempts to cut small stars out of good old burlap, but each ‘edge’ of the star unraveled, leaving me with a 3 or 4 pronged/misshapen star. Perhaps if I see some pre-cut burlap stars that fit the bill at a craft store I will buy them and see if I like how they look on the flag.

Burlap Webbing American Flag

I just love how this craft came out! Currently it’s on the foyer table instead of its intended shelf destination—we’ll see if it stays put.


Happy 4th of July!!


1 19 20 21 22 23 42