Janod Toy Review

During the BC (Before Child) era, my husband and I frequented HomeGoods for throw pillows, knick knacks and kitchen gadgets. Now-a-days we head straight for the kids section. We often find board books (L’s fave), cute storage baskets and high end toys. On a particularly lucky trip, we scored three Janod toys (our favorite toy brand). From past HomeGoods’ experiences we’ve learned that if you like it, buy it. It definitely will not be there tomorrow and you can always return if buyer’s remorse sets in. I passed on a Land of Nod play tent, and I’m still kicking myself for it.

toy review 1

We first came across Janod toys at a local baby boutique years ago. My husband is big on green toys, and I have a thing for wooden toys. Janod meets both of our preferences. We love this brand’s modern designs, impeccable quality and functionalities. Not to mention the adorable packaging the toys come in. I’m sucker for cute packaging. The toy maker is French. Their products are usually carried by smaller boutiques and online retailers like Amazon. The company has an array of products ranging from board games to play kitchens to backpacks. The prices for some of the toys are a bit expensive, but if you find them at HomeGoods, they are a steal.

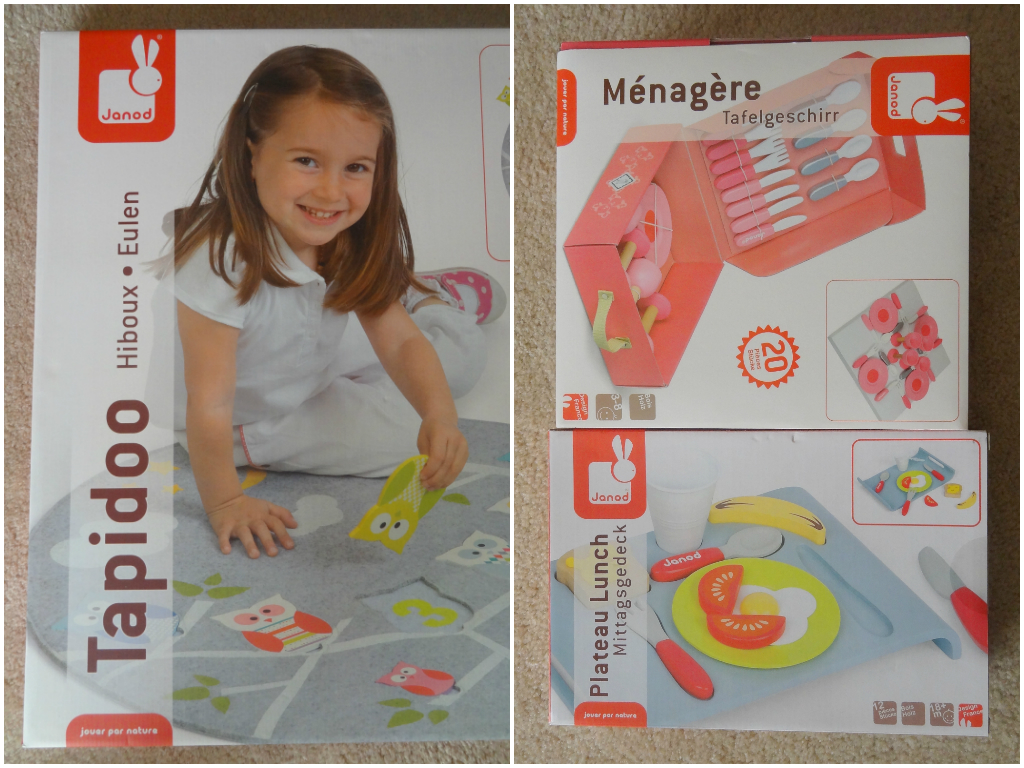
First up is the Plateau Lunch set, albeit a very European lunch. Don’t you just love the cheery color combination? For young tots like L, this set is great for fine motor skills, learning daily objects and use of utensils. Each piece, with exception of the cup, is made out of wood. The scale is perfect for little hands. I like that each piece is outlined on one side of the tray to help with sorting. This toy can grow with L in time for tea parties, picnics and play kitchen.

Janod Lunch Toy Review

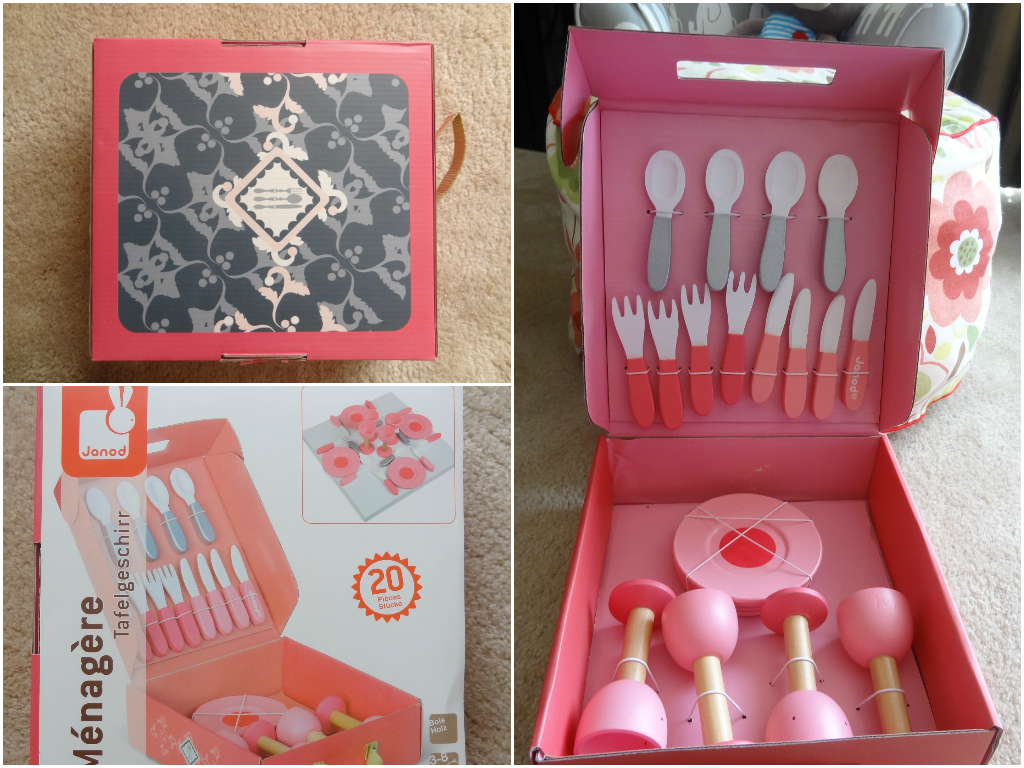
The packaging of the Menagere picnic set sells itself. To me the glasses look like champagne flutes. Fancy! Then again, it is French. The color scheme is very pink, but seems fit for a princess’s picnic. Similar to the lunch set, each piece was made from wood. The only down side is the utensils and cups are a bit difficult to put back into the elastic slots. We purchased this toy as a gift for a friend’s 2 year old. She loves it!

picnic tpy 1

Janod picnic toy review 2

The box Tapidoo floor puzzle came in was rather large. So I thought it could potentially double as a small area rug in a play room. But the actual puzzle was a lot smaller, 27 inches in diameter. You can get a better idea from the pictures with L. The floor mat is made from felt and is soft and cushy. The owl puzzle pieces are made from wood. I love the colors, and it’s gender neutral. The graphics on the mat are painted on–not sure how that will hold up in the long run. I imagine the soft gray color will attract/show all sorts of stains. L has been playing with it for a month, so far so good.

Janod floor puizzle 1

Janod floor puzzle 2

So next time you’re at HomeGoods don’t forget to check out the kiddie section and share what treasures you’ve scored with us!

A Mother’s Day DIY

Take one step into any store, you’ll know it’s Mother’s Day weekend. I always like to browse the greeting card section this time of the year to read the sweet little poems, punny jokes and clever sayings. There are so many options!!! It is the “mother of all mail days” after all (quick, name that TV show). Kevin James does a pretty accurate depiction of how I pick out a card.

Quite a few of my friends are celebrating their very first Mother’s Day this Sunday. I was all excited to pick out a few Mother’s Day cards during a trip to Target, but L wanted no part of it. Sitting in a shopping cart that’s not moving is not her thing. Anyway, I took advantage of nap time one afternoon and made a few cards for friends and family to commemorate the special day.

Mother's Day card 1

mother's day DIY card 2  mother's day diy card 3

The front of each card is personalized with dates and a message. The back reads “Making the decision to have a child is momentous. It is to decide forever to have your heart go walking around outside your body”~Elizabeth Stone.

mother's day diy front  mother's day diy back

This Mother’s Day DIY didn’t require a lot of materials. Here is what I used:

Mother's Day DIY Materials

  • 2 sheets of 12”x18” brown construction paper (made 6 cards)
  • 2 packs of decorative flowers (found at scrapbook section, bought 3 used 2)
  • 1 pack of green embroidery floss
  • 6 library book cards (thanks to media center book weeding!)
  • a few green paint chips
  • a piece of news paper
  • ribbons

The inspiration for the cards came from here. They were super easy to make thanks to my trusty hot glue gun and the detailed instructional video. I changed the design a bit and adapted a few steps to work with the tools/materials I had. I also cheated with the flowers. Instead of hand stamp/emboss each flower, suggested by the video, I used store bought crepe paper flowers. I guess I should change the title to A Mother’s Day Semi-DIY.

mother's day diy card 5

Happy Mother’s Day to all the mommas out there!

Painted Barstools

One of my favorite parts of our kitchen is the island. Now that I have one, I cannot imagine a future kitchen without one (or at least a peninsula of some sort). For the first year that we lived in our house, we found ourselves standing around the island a lot—island seating wasn’t high on our “fixer upper” priority list. During year two, it was time to take some action.

We knew we wanted barstools without a back. We loved the saddle stools at Pottery Barn but weren’t as in love with the hefty price tag. After looking around, we only found stools in colors that weren’t our top choices. It became clear that we should just paint some stools ourselves.

painted barstools

What you need:

Unfinished Wood Barstools—we scored two online for $50

Fine Sandpaper

Primer

Paint

Foam brush

Protective Top Coat

Plastic Covering and Painter’s Tape- only needed if you are doing a two-toned stool

Stain/Stain Rag- only needed if you are doing a two-toned stool


Step 1:

As your stools are unfinished, they should be pretty smooth and free of splintering wood. Give your stools a super light and casual sanding—just in case. We wanted a two-toned stool—wood stain on the seat and paint on the legs. Because of this, I used painter’s tape to cover up the saddle seat with part of a plastic drop cloth. Make sure it’s covered all the way so no primer gets through!

Barstool, unfinished Step 2:

Prime your stools (or, like in my case just prime the legs). For the first time ever, I used a spray primer. The spray primer went on great—very easy to use. Follow the directions on your primer can to ensure correct application. Let dry completely.

Step 3:

While my seat was still wrapped up, I painted the legs of my stool. I applied two coats of paint using a small foam brush. Let dry completely.

primed barstools

You can see the one stool has been painted, while the other one is primed and ready for some color. Pardon the mess!

Step 4:

With the stool legs completely painted and dry, I removed the plastic covering from the saddle seat. I wanted to stain the top of the seat a color that would closest match our hardwood floors. Minwax’s Natural color did the job. Follow the direction on the stain can for the correct application procedure. I did two coats of stain.

Step 5:

Apply your finish/top coat. Again, we went with a spray for this step and used two coats. Make sure you do this in a well ventilated area—it can get a bit stinky! Let dry completely.

painted barstools 2

We’re happy to finally have somewhere to sit!

1 26 27 28 29 30 42