Posts Tagged ‘DIY’

DIY Door Silencer

These days L is obsessed with opening and closing doors. OBSESSED!! I can just hear my mom now “well, why don’t you just keep all your doors closed”? We try, but the girl is fast, like Flash fast. As soon we crack a door she’s there. I fear for her little fingers every time she touches a door. So I decided to DIY a few door silencers to prevent squished fingers. Their intended purpose is to close doors quietly for sleeping babies but the padding will also prevent doors from slamming. They were very easy to sew, literally a few rectangles. Each one took about five minutes.

DIY silencer 1

Materials (for 1):

  • 1/8 yard fabric (I used scrap fabric from other projects)
  • 5″ x 3″ batting or felt (use another layer or two of fabric if you don’t have these)
  • two 2” long elastic or two 13” long ribbon

DIY silencer materials

*If you don’t have any scrap fabric, upcycle some old clothes.

Step 1:

Cut two 5” x 3” rectangles from your fabric. Cut one rectangle of the same size from your padding. I eyeballed my door lock and this measurement seemed appropriate. Be sure to measure yours if you have something other than the standard lock. I used 2 different fabrics for the front and back.
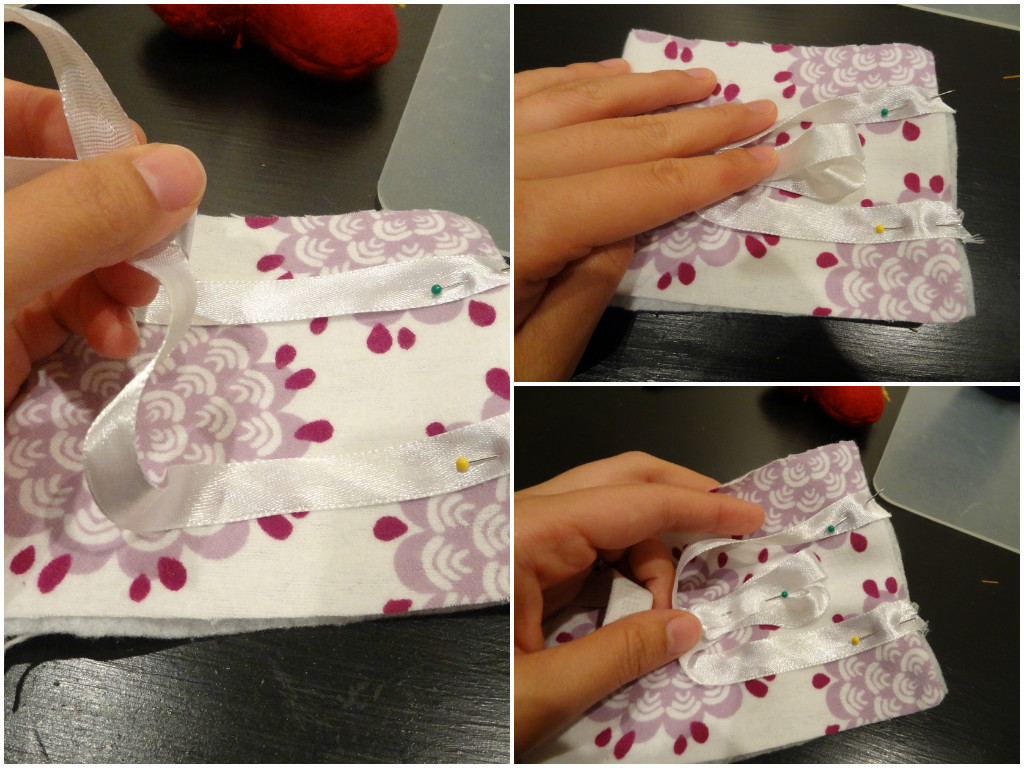
DIY silencer

Step 2:

Place one of the fabric rectangles on top of the padding (wrong side down). Make a U shape with an elastic piece. Pin each end of the U to the shorter side of the rectangle. Make sure the elastic U lays on the fabric and not outward like a handle.

DIY door silencer2

*If you are using ribbon, fold the excess neatly and pin to the center of the rectangle.

DIY door silencer3

Step 3:

Place the second fabric rectangle on top of the first one, right sides together. Pin all the way around.

DIY door silencer

Step 4:

Sew all the way around the rectangle leaving a small opening. Be sure to back stitch on the elastic/ribbon for a stronger hold.

DIY door silencer

Step 5:

Turn your rectangle inside out from the opening.

DIY door silencer

Step 6:

Sew the opening shut with a blind stitch. Ta-da! If you are feeling fancy, do step 7.

*If you are using ribbon, cut each loop in half and trim the ends.

Step 7 (optional):

Do a top stitch all around for a decorative touch. If you are feeling super fancy, I recommend ironing the seams before top stitching.

DIY door silencer

I like the look of the ribbon tie ones better, but the elastic ones are easier to hook on and off. Now that these are on the doors I don’t cringe as much when L is pushing a door shut. I have a feeling these will also come in handy during the moody, back talking teenage years.

silencer 4

silencer 5

Now my husband seems to think these are unnecessary. Your thoughts? Do you think they make a practical baby shower gift? Do your children have any strange obsessions?

Burlap Basket Liners

Burlap Basket Liner

Every once in a while, I have what I consider million dollar ideas. Generally, they are either not worthy of a million dollars or have already been done. My latest idea for burlap basket liners is definitely worth a million dollars (helllllo, it’s burlap we are talking about), but I am sure it has been done before.

The other day as I was strolling the aisles of Lowe’s, I happened upon the hanging planter baskets. Coconut basket liners are not expensive, but they aren’t cheap. In fact, the liners are almost the same price as the baskets themselves. It was then after holding a coconut liner in my hand for entirely too long (this is why my husband does not like to shop with me), I thought that a burlap basket liner would work perfectly.

What You’ll Need:

Burlap Basket Liner

- Burlap— I got my burlap from burlapfabric.com– it’s a steal for 5 yards of burlap for less than $7. Seriously, I will not get burlap anywhere else. The prices are ridiculously good and the shipping is fast!

- Scissors

-Diapers (yup, diapers).


What You’ll Do:

- Place your hanging basket on the burlap.

Burlap Basket Liner

- Cut a piece of burlap that is larger than the circumference of your basket.

Burlap Basket Liner

- Place the burlap in the basket (like when you put a napkin in a bowl before putting snacks in)

Burlap Basket Liner

- Put another piece of burlap in the basket (I just used some scraps) to help reinforce the liner.

-  Cut two diapers in half.

-Place three of the halves (moisture absorbing side up) in the bottom of the basket.

Extra Absorbent!

Extra Absorbent!

It’s ready for your plants!

Burlap Basket Liner


Heat Embossing 101

Embossing is fabulous—it’s the perfect way to embellish paper and turn it into something special. Have invitations to send out? Place cards to make for that fancy get-together? Gift tags to stick on those carefully selected presents? Why not emboss all of these things and add a little glamour to what you do!

You’ve all seen embossed items—today I’m going to describe heat embossing so your design is upraised from the paper. It is a very easy process that anyone can do. The following tutorial shows my mother-in-law and I making the tags for a Wishing Tree at a recent bridal shower. We got our goodies at Paper Source– be warned you will buy everything you see– I love this place!

embossed

What you need:

Paper—whatever you are creating (tags, invites, etc.)

Ink—in the colors you would like your design to be

**Pigment ink is what you need- it dries slower so you can apply the powder. VersaMark

Watermark is clear ink and is the brand that I’ve used- found at craft stores.**

Embossing Powder—in the colors you would like your design to be

Embossing Heat Tool—sold in craft stores—Walmart has one for $15

Rubber Stamp/Design of your choose

Paper/Folder- as a work surface to catch overflow powder


Step 1:

Choose your color(s) and corresponding stamps. We had a border stamp which would be black and a letter ‘G’ which would be gold.

With this in mind, we planned to use a black ink pad for the border coupled with clear embossing powder. For the ‘G’ we would use the VersaMark clear ink pad and gold embossing powder on top of the clear stamped ‘G’.

Step 2:

After stamping each paper with the border in black ink we were ready to start the embossing.

embossing

Step 3:

Using the clear ink pad we stamped the ‘G’ in the center of each oval. As it’s a clear stamp, be sure to take note of what you’ve stamped—if you lose track, you can see it if you look closely.

emboss step 2

Step 4:

After the clear ‘G’ is on the paper, sprinkle the embossing powder on top. You’ll see that it sticks to the stamp. Shake off the excess powder.

This is where it’s crucial to have a manila folder or a slightly folded piece of paper underneath. The excess powder will fall onto the paper and you can then refill your powder container every once in a while. You do not want to waste this stuff!

powdered G

Step 5:

Use your heat tool to melt the grains of powder into a smooth surface. It’s nerdy, but I think it’s kind of cool to see just how quickly it melts into your upraised design.

If you’re doing a large project (we did about 50 cards) and you have a helper, it is best to get an assembly line going. My mother-in-law stamped and passed them off to me for sprinkling/heating.

Just a note- If you don’t have a heat tool, I’ve seen online that it works with some hairdryers, but you need it to be super hot and it takes longer to do. I haven’t personally known anyone to use this method.

emboss step 6

Step 6:

Your newly embossed products are good to go! You can do really neat things with embossing, such as tone on tone, or emboss the design and then color the background only with a contrasting ink color. The possibilities are vast and it is an easy craft with a great impact.

picture1Don’t these tags look great on the Wishing Tree at the bridal shower?!

Here’s a picture of my bridal shower invitation and our seed paper wedding favors, both created by embossing:

bridal shower and wedding favorHappy Embossing!


1 6 7 8 9 10 11