I’m sure you’ve seen these DIY Sharpie coffee mugs on Pinterest. I’ve been dying to try it myself. I finally had the chance to tackle this DIY for my mother-in-law’s 60th birthday last week.
Materials:
White mug
Pencil
Sharpies (fine and regular tip)
Stencil/letter stickers (optional)
Step 1:
Thoroughly clean the mug and wipe it with rubbing alcohol. Let it dry completely.
Step 2:
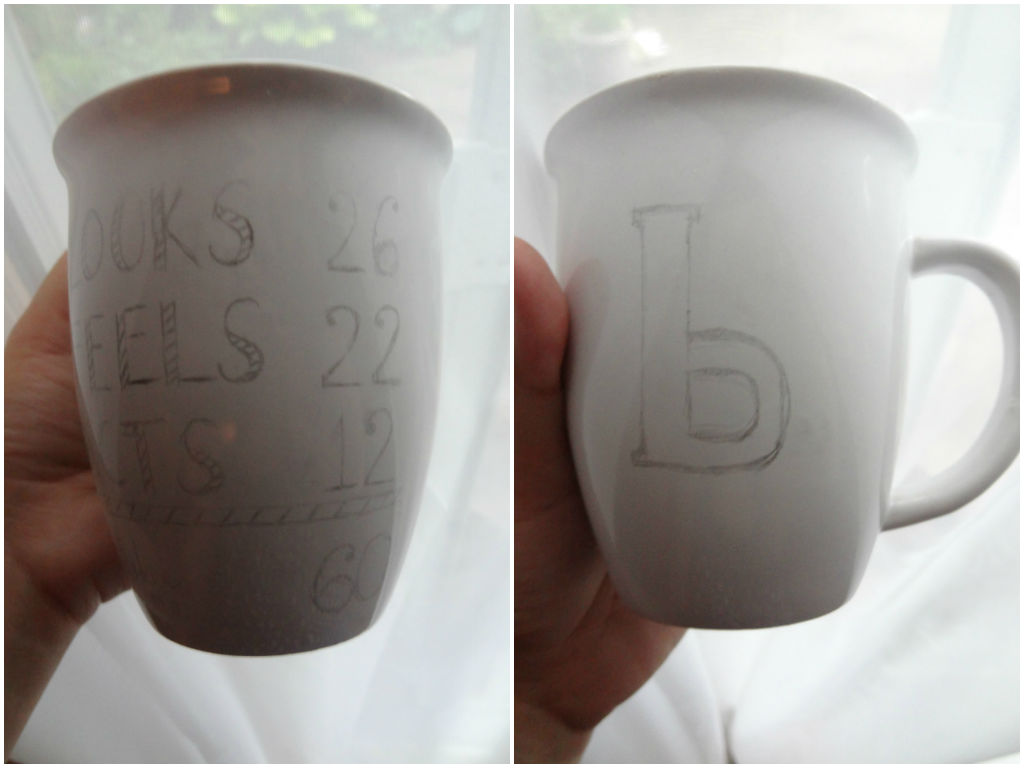
Use a pencil, sketch or stencil on the design. I decided to use a pencil first to map out size and position. If you are brave, skip this step and go straight to Sharpie. Also double check your math to make sure the numbers add up if you are using a similar design.
Step 3:
Outline the design with a fine tip Sharpie. I traced over the letters from right to left to avoid smudges. Erase any pencil marks with a napkin. A damp napkin will allow you to wipe off the Sharpie.
* For the back of the mug, I dotted around the “b”. Holding the Sharpie at an angle will give you ovals. If you want perfect circular dots, hold the Sharpie perpendicular to the mug.
Step 4:
Set the mug aside to cure for 24 hours.
Step 5:
Bake at 375 degrees for 35 minutes. The following tip is for my husband. Be sure to put the mug in a cold oven and let it warm up along with the oven. Do not preheat.
Easy right? I’m itching to make more of these. I think Santa may leave one for each one in the family. Have you made these before? What pins have you been dying to try?
Growing up, my parents had a makeshift growth chart on the inside door frame of our kitchen pantry. Nothing fancy, just pencil marks and dates. Naturally I want to do this for L. Since we have yet to find our forever home, I wanted to make something portable. Plus we don’t even have a pantry in our current house. I thought something like this would be perfect for L’s room since she has a few burlap/grass cloth accents in there already. Also the miles of webbing from the fabulous BurlapFabric.com were itching for a project.
Materials:
2.5 yards of webbing or burlap ribbon (I’m using webbing with purple stripe from burlapfabric.com)
Measuring tape
Sharpies (fine and regular tip)
2″ number stencil
12″ Jute or ribbon
Safety pins
Step 1:
Line up the webbing with the measuring tape. Be sure to trim the edge so it’s straight. You can also use some painter’s tape to hold the burlap in place.
Step 2:
Draw a hash mark at every inch with a Sharpie. I made the dashes longer at every ½ foot and longest at every foot mark.
*I messed up the hash marks the first time. I made every 5 inches longer instead of 6 (notice in the above right picture). Womp! Luckily, the webbing was two sided. I flipped it over and restarted. Don’t make the same mistake I did!
Step 3:
Stencil on the numbers. I used a fine tip Sharpie to outline the stencil first then filled in with a regular Sharpie.
Step 4:
Fold the excess webbing to the back. Trim it if you have more than 3-4 inches hanging. Use safety pins or stitch the folded over material in place, creating a loop.
Step 5:
Thread a piece of jute or ribbon through the loop.
Some the burlap growth charts on Etsy come with small gift tags or key tags to record height. I found these small wooden scrapbook sticker flags at Joann’s. I think they go nicely with the burlap and jute.
I love how it turned out. Now if only L would stand still long enough for me to measure her. My only complaint is that it did make her room smell like burlap after it was hung. But if you happen to LOVE the smell of burlap (ahem Grace) you may not even noticed it.
Stay tuned for many more burlap projects. In the meantime, share with us what gorgeous/clever burlap creations you have pinned lately.
Share the post "Grow Baby Grow-DIY burlap growth chart"
So over the past few weeks I showed you how to Age Terracotta Pots, create a Moss Covered Letter, and emboss some paper goods. All of these crafts were part of a bridal shower, hosted by my mother-in-law for our cousin Justine. The theme of the shower was vintage garden and boy did the house transform and play the part beautifully!
Here are a few shots from the shower—it’s amazing what a bit of planning, creativity, and elbow grease can accomplish! I think it was beautiful and the pictures do not even do it justice.
I just love this sign. My mother-in-law hand painted the letters and distressed each one—I thought it was a printable it looks so perfect! The raffia is a great touch to add to the vintage feel of the shower. Since this sign isn’t customized to the bride and groom, the family can use it for future weddings.
There were lots of small chalkboards throughout the shower—with cute wedding related phrases or quotes. This just solidifies the notion that chalkboards are the perfect décor for any occasion.
The laundry room underwent a transformation and became the drinks/dessert area. Never underestimate the power of white tablecloths and a burlap accent runner. A few garden related items were all that were needed to connect this room to the theme.
The desserts served were mini pastries, cookies, and that gorgeous cake—made to look like a terracotta pot with flowers! It was not only pretty to look at but pretty delicious too.
The cookies were made by yours truly. I have been dying to try out the frame cookie cutter (from Karen’s Cookies) and thought that this was the perfect occasion. Given the natural theme, I wanted do to more subdued and simple cookies. It was my first time writing with icing, and I think they came out pretty good!
As the shower was in the mid afternoon, the food served was light and refreshing. The greenery of the different salads enhanced the theme and looked lovely on the table.
Check out this moss covered gift box that my sister-in-law, Lauren, made. Is it not the cutest thing ever? It served as décor right up until Justine opened it as a gift. Lauren is a graphic designer and extremely artistic/clever. Not only did she make the box, but also the gift inside—a cute frame that acts as a wedding ring holder. Maybe one day Lauren will feature some of her talents on our blog
The Moss Covered G that I posted about earlier looked great in the dining room. In addition to being décor, it serves as a personalized gift for the bride and groom.
Aside from the food in the dining room, there was also a table full of fruit, cheese, grilled vegetables, dips, etc. Again, all finger food that was light and well suited for an afternoon shower. I thought the table scape was beautiful.
See this statue? Can you believe my mother in law aged this herself?? Incredible!
The bride and groom received many well wishes on the wishing tree. The embossed tags from my earlier blog post looked great on the tree. The tree was a gift for the bride and groom for their new home.
Remember those terracotta pots we showed you how to age? Here’s the final product! Each guest received an herb to take home—the pots/herbs were a huge success, everyone loved them. Talk about a perfect favor for a vintage garden shower!
The shower was a wonderful day for everyone—especially for the bride and her family. It was a lot of fun making some of the crafts that were featured in the shower. With lots of younger siblings and cousins in our family, I’m sensing that there might be more happy family occasions to plan and craft for in the future!