Posts Tagged ‘Easy’

Drink Up-DIY Sharpie coffee mug

I’m sure you’ve seen these DIY Sharpie coffee mugs on Pinterest. I’ve been dying to try it myself. I finally had the chance to tackle this DIY for my mother-in-law’s 60th birthday last week.

DIY Sharpie Mug 1

Materials:

  • White mug
  • Pencil
  • Sharpies (fine and regular tip)
  • Stencil/letter stickers (optional)

DSC02170

Step 1:

Thoroughly clean the mug and wipe it with rubbing alcohol. Let it dry completely.

Step 2:

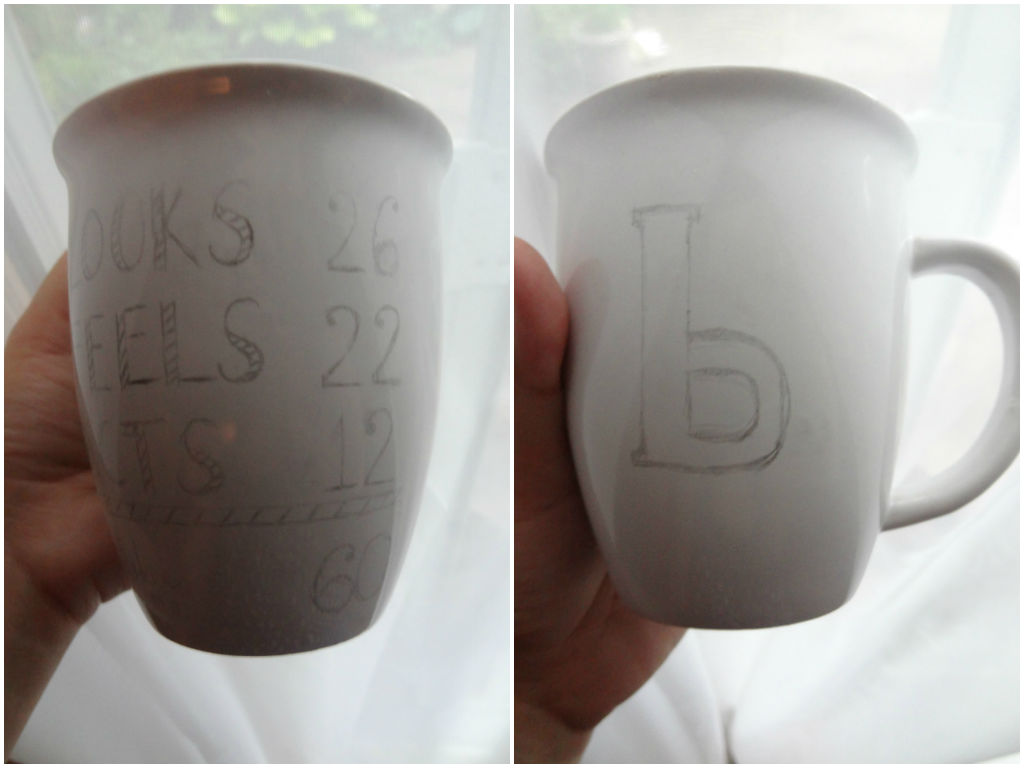
Use a pencil, sketch or stencil on the design. I decided to use a pencil first to map out size and position. If you are brave, skip this step and go straight to Sharpie. Also double check your math to make sure the numbers add up if you are using a similar design. :)

DIY Sharpie Mug 2

Step 3:

Outline the design with a fine tip Sharpie. I traced over the letters from right to left to avoid smudges. Erase any pencil marks with a napkin. A damp napkin will allow you to wipe off the Sharpie.

DIY Sharpie Mug 3

* For the back of the mug, I dotted around the “b”. Holding the Sharpie at an angle will give you ovals. If you want perfect circular dots, hold the Sharpie perpendicular to the mug.

Step 4:

Set the mug aside to cure for 24 hours.

Step 5:

Bake at 375 degrees for 35 minutes. The following tip is for my husband. Be sure to put the mug in a cold oven and let it warm up along with the oven. Do not preheat.

DIY Sharpie Mug 4

 Easy right? I’m itching to make more of these. I think Santa may leave one for each one in the family. ;) Have you made these before? What pins have you been dying to try?

Grow Baby Grow-DIY burlap growth chart

Growing up, my parents had a makeshift growth chart on the inside door frame of our kitchen pantry. Nothing fancy, just pencil marks and dates. Naturally I want to do this for L. Since we have yet to find our forever home, I wanted to make something portable. Plus we don’t even have a pantry in our current house. I thought something like this would be perfect for L’s room since she has a few burlap/grass cloth accents in there already. Also the miles of webbing from the fabulous BurlapFabric.com were itching for a project.

Materials:

DIY growth chart 1

  • 2.5 yards of webbing or burlap ribbon  (I’m using webbing with purple stripe from burlapfabric.com)
  • Measuring tape
  • Sharpies (fine and regular tip)
  • 2″ number stencil
  • 12″ Jute or ribbon
  • Safety pins

Step 1:

Line up the webbing with the measuring tape. Be sure to trim the edge so it’s straight. You can also use some painter’s tape to hold the burlap in place.

burlap growth chart 2

Step 2:

Draw a hash mark at every inch with a Sharpie. I made the dashes longer at every ½ foot and longest at every foot mark.

burlap growth chart 3

*I messed up the hash marks the first time. I made every 5 inches longer instead of 6 (notice in the above right picture). Womp! Luckily, the webbing was two sided. I flipped it over and restarted. Don’t make the same mistake I did!

Step 3:

Stencil on the numbers. I used a fine tip Sharpie to outline the stencil first then filled in with a regular Sharpie.

burlap growth chart 4

Step 4:

Fold the excess webbing to the back. Trim it if you have more than 3-4 inches hanging. Use safety pins or stitch the folded over material in place, creating a loop.

Step 5:

Thread a piece of jute or ribbon through the loop.

Some the burlap growth charts on Etsy come with small gift tags or key tags to record height. I found these small wooden scrapbook sticker flags at Joann’s. I think they go nicely with the burlap and jute.

burlap growth chart 5

I love how it turned out. Now if only L would stand still long enough for me to measure her. My only complaint is that it did make her room smell like burlap after it was hung. But if you happen to LOVE the smell of burlap (ahem Grace) you may not even noticed it.

burlap growth chart 6

Stay tuned for many more burlap projects. In the meantime, share with us what gorgeous/clever burlap creations you have pinned lately.


Burlap Basket Liners

Burlap Basket Liner

Every once in a while, I have what I consider million dollar ideas. Generally, they are either not worthy of a million dollars or have already been done. My latest idea for burlap basket liners is definitely worth a million dollars (helllllo, it’s burlap we are talking about), but I am sure it has been done before.

The other day as I was strolling the aisles of Lowe’s, I happened upon the hanging planter baskets. Coconut basket liners are not expensive, but they aren’t cheap. In fact, the liners are almost the same price as the baskets themselves. It was then after holding a coconut liner in my hand for entirely too long (this is why my husband does not like to shop with me), I thought that a burlap basket liner would work perfectly.

What You’ll Need:

Burlap Basket Liner

- Burlap— I got my burlap from burlapfabric.com– it’s a steal for 5 yards of burlap for less than $7. Seriously, I will not get burlap anywhere else. The prices are ridiculously good and the shipping is fast!

- Scissors

-Diapers (yup, diapers).


What You’ll Do:

- Place your hanging basket on the burlap.

Burlap Basket Liner

- Cut a piece of burlap that is larger than the circumference of your basket.

Burlap Basket Liner

- Place the burlap in the basket (like when you put a napkin in a bowl before putting snacks in)

Burlap Basket Liner

- Put another piece of burlap in the basket (I just used some scraps) to help reinforce the liner.

-  Cut two diapers in half.

-Place three of the halves (moisture absorbing side up) in the bottom of the basket.

Extra Absorbent!

Extra Absorbent!

It’s ready for your plants!

Burlap Basket Liner


1 2 3 4 5