Posts Tagged ‘inspiration’

Hide Those TV Components

I’ll be the first to admit it—I love TV. My husband thinks that I enjoy watching TV so much because I did not experience cable TV until I went to college. Yup, I grew up with channels 2, 4, 5, 7, 9, 11, & 13, which seemed just fine to me. Now, what I don’t particularly love about TV is the number of wires/components that go with it.

When we first moved in, we used a large cabinet as our TV stand. It housed all TV/Wireless related components, DVDs, photo albums, and the occasional other random thing or two. Everything was hidden out of sight.

A clear sign of recent moving- sparse rooms

A clear sign of recent moving- sparse rooms

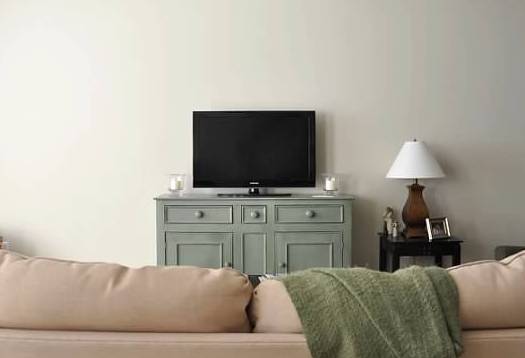
After being in our house a year and a half, it was my project to breathe some new life into our living room. As much as I loved the green piece, I knew I wanted to move it to the bay window and use it to hold platters and things of that nature. Instead of a bulky piece of furniture, I wanted an open piece for our TV in order to keep the room airy.

While furniture shopping with my mother in law, we found this console table at Pottery Barn on super-super clearance, and I knew it was meant to be.

*image taken from Google*

*image taken from Google*

The first thing I wanted to do was lift the TV off the stand and mount it on the wall. Since we didn’t want wires hanging down, we purchased this fabulous kit by PowerBridge that forces the wires to go behind the wall.

*image taken from amazon*

*image taken from amazon*

It was a matter of cutting two rectangles into the wall, hooking up the wires, and mounting the TV to the wall. It was a quick, two person job, and I just love having the TV off of the table.

Now, what to do with our cable box, router, and wireless access point/back up hard drive? I was not a fan of how they looked sitting out under the table—it was a bit lackluster and too much metal going on.

P1030557It didn’t take but a minute to think of a solution—hide it in a pretty basket of some sort. Yet again I was off on another quest to Homegoods. While I liked the baskets, I was drawn to something else. You’ve all seen the boxes that look like books:

bookThey were smaller than a basket, yet big enough for the things I needed hidden. They were also more sturdy and would allow me to stack one on top of the other.

The only thing I needed to modify was that I wanted air to circulate around the components. My lovely husband pointed out that it would be quite easy to cut the back side of the box, allowing plenty of air flow. I suppose you could do this with a handsaw (it might be hard to get a perfectly straight line), but he used our trusty jigsaw.

cut book

With the TV wires and components now hidden, I’m one happy couch potato!

P1030537

P1030544


Powder Room Face Lift

We found our townhouse when we weren’t even seriously looking to move. We saw this house had popped up via foreclosure and when we went for a walk through we knew that the opportunity was too good to pass up. The house was in no means unlivable (compared to my old condo—which upon seeing it for the first time with my father I literally cried while he was like a child in a candy store). The house just needed a bit of TLC and some elbow grease, which we were more than willing to do.

It’s been a process, but we’ve chipped our way along most of the rooms in the house, trying to turn the damaged or lackluster spaces into something a bit more cozy and to our taste. Unfortunately, we’re not Rockefellers, so we’ve had to be very conscious of budgeting money for projects and choosing where to save and where to splurge just a wee bit.

The powder room in our house was a great candidate for a face lift. Here’s a shot before we moved in:

house5

Not bad at all—the brown paint was a lot more intense than it seems in the photo, and the toilet, as in most vacant houses, had seen much better days. There was no mirror, towel bar, or lighting fixture—the bank had sold off these types of things in the entire house. These were some easy fixes.

As the entire house had each room a different color (seriously– avocado green, navy blue, purple, both light and dark, orange, brown, sea foam green, and one in a peachy Venetian plaster faux finish), we chose to have it professionally painted one color before we moved in. With a two story foyer and crazy vaulted ceilings, it was worth it to us to pay to have the whole place painted a neutral color. We could then decide individual room paint colors later on and do this ourselves. We chose Wool Skein by Sherwin Williams- a great, warm neutral color.

wool skein joined

Here’s a shot after the neutral color went on as well as after we put in a new toilet (sorry it’s dark).

step0004

After adding a mirror, lighting fixture, towel bar, and toilet paper holder, the bathroom was fresh and functional. We left it this way for a little over a year and a half as we focused our attention on other spaces.

Since we decorated our living space on the first floor in hues of greens, blues, and creams, it was time to revisit the powder room.  We wanted to coordinate the bathroom with the living space and newly constructed built in entertainment center.

It didn’t take much to further transform this bathroom. I love the look of beadboard in a bathroom, especially in a half bath where there may not be much character in the space. I think pairing blue or gray paint with white beadboard is a classic look (luckily my husband agrees) so our decision was easily made.

We put up the beadboard which was actually fairly easy to do. It is just a matter of cutting the sheet down to size, holding it against the wall, and using a nail gun to secure it in place—definitely a two person job.

Action shot of my hard worker :)

Action shot of my hard worker :)

We then painted the walls from the top down to where the beadboard started. We came close to the top of the beadboard but were not concerned about being perfect as the chair rail would cover this anyway. The paint color is Aloof Gray by Sherwin Williams. It is a lovely color that I would certainly use again in the future.

aloof gray joinedAfter this dried, we installed the chair rail. We gave the chair rail and beadboard two coats of white paint that we had leftover from painting other trim in our house. After cutting/painting some base molding and then quarter round to match the wood floors, we were all set! This entire project took us a weekend to do.

Keeping with the sailing/Annapolis area theme of the basement, I found two photos, one of the Chesapeake Bay Bridge and another of the Thomas Point Shoal Lighthouse. It took a while to find frames that were a good match for the colors in the bathroom. I settled on these Threshold ones from Target:

frame

I just needed a garbage pail and basket for toilet paper, and knew Homegoods was the place to find these. I settled on an antique looking wire basket with burlap lining for our toilet paper holder, and a natural basket for our garbage pail.

Here’s the final product:

P1030510new one P1030520

P1030516

 before after

I’m very happy with how this mini transformation came out. It was not expensive, took little time to do, and was a huge improvement from the dark cave-like space it used to be.

Have any of you given a mini makeover to your spaces lately?


A Vintage Garden Bridal Shower

So over the past few weeks I showed you how to Age Terracotta Pots, create a Moss Covered Letter, and emboss some paper goods. All of these crafts were part of a bridal shower, hosted by my mother-in-law for our cousin Justine. The theme of the shower was vintage garden and boy did the house transform and play the part beautifully!

Here are a few shots from the shower—it’s amazing what a bit of planning, creativity, and elbow grease can accomplish! I think it was beautiful and the pictures do not even do it justice.

Vintage Garden Bridal Shower
I just love this sign. My mother-in-law hand painted the letters and distressed each one—I thought it was a printable it looks so perfect! The raffia is a great touch to add to the vintage feel of the shower. Since this sign isn’t customized to the bride and groom, the family can use it for future weddings.

Vintage Garden Bridal Shower
There were lots of small chalkboards throughout the shower—with cute wedding related phrases or quotes. This just solidifies the notion that chalkboards are the perfect décor for any occasion.

Vintage Garden Bridal Shower
The laundry room underwent a transformation and became the drinks/dessert area. Never underestimate the power of white tablecloths and a burlap accent runner. A few garden related items were all that were needed to connect this room to the theme.

Vintage Garden Bridal Shower
The desserts served were mini pastries, cookies, and that gorgeous cake—made to look like a terracotta pot with flowers! It was not only pretty to look at but pretty delicious too.

Vintage Garden Bridal Shower Cookies
The cookies were made by yours truly. I have been dying to try out the frame cookie cutter (from Karen’s Cookies) and thought that this was the perfect occasion. Given the natural theme, I wanted do to more subdued and simple cookies. It was my first time writing with icing, and I think they came out pretty good!

Vintage Garden Bridal Shower
As the shower was in the mid afternoon, the food served was light and refreshing. The greenery of the different salads enhanced the theme and looked lovely on the table.

Vintage Garden Bridal Shower
Check out this moss covered gift box that my sister-in-law, Lauren, made. Is it not the cutest thing ever? It served as décor right up until Justine opened it as a gift. Lauren is a graphic designer and extremely artistic/clever. Not only did she make the box, but also the gift inside—a cute frame that acts as a wedding ring holder. Maybe one day Lauren will feature some of her talents on our blog :)

Vintage Garden Bridal ShowerThe Moss Covered G that I posted about earlier looked great in the dining room. In addition to being décor, it serves as a personalized gift for the bride and groom.

Vintage Garden Bridal ShowerAside from the food in the dining room, there was also a table full of fruit, cheese, grilled vegetables, dips, etc. Again, all finger food that was light and well suited for an afternoon shower. I thought the table scape was beautiful.

Vintage Garden Bridal ShowerSee this statue? Can you believe my mother in law aged this herself?? Incredible!

Vintage Garden Bridal Shower
The bride and groom received many well wishes on the wishing tree. The embossed tags from my earlier blog post looked great on the tree. The tree was a gift for the bride and groom for their new home.

Vintage Garden Bridal ShowerRemember those terracotta pots we showed you how to age? Here’s the final product! Each guest received an herb to take home—the pots/herbs were a huge success, everyone loved them. Talk about a perfect favor for a vintage garden shower!


The shower was a wonderful day for everyone—especially for the bride and her family. It was a lot of fun making some of the crafts that were featured in the shower. With lots of younger siblings and cousins in our family, I’m sensing that there might be more happy family occasions to plan and craft for in the future!

1 2 3