Posts Tagged ‘Tutorial’

Burlap Webbing American Flag

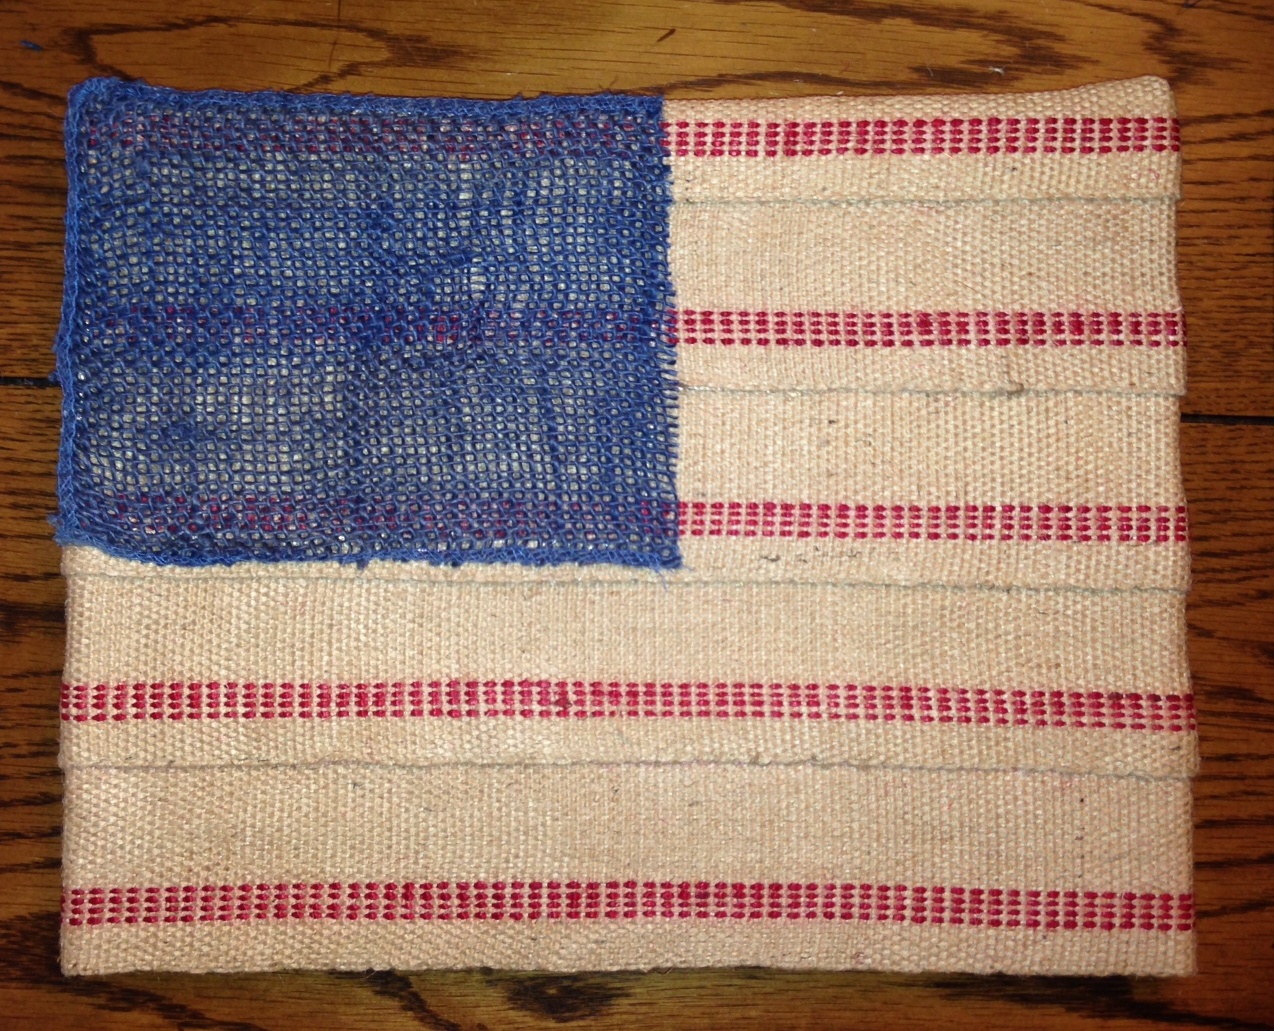
When I first saw the red ticked burlap webbing that we received from burlapfabric.com, I immediately thought of two things: Christmas and American Flag. Since it’s a bit early for Christmas crafts, I’m going to share the Burlap Webbing American Flag that I envisioned and was (happily) able to create.

I knew the webbing would be a great fit for a rustic style American Flag—perfect for our home décor.

 Burlap Webbing American Flag

What you need:

Canvas (I suppose you could use wood too)

Red Ticked Burlap Webbing

Blue Burlap Garland (found in floral section of craft store) – or any leftover blue fabric you may have

Hot Glue Gun

Scissors

Optional- something for stars

Burlap Webbing American Flag

Step 1:

Cut your strips down to size so they fit your canvas. I chose to wrap my strips around the sides of my canvas so the white edges weren’t exposed. I did not wrap the bottom, as it will be leaning on a table or shelf, but I did choose to wrap the top. In total I needed 5 strips.

I also cut out a rectangle from my blue burlap garland to serve as the blue part of my flag.

Step 2:

Layout your strips next to your canvas. As you can see, the strips are quite a bit taller than the canvas, so you have to decide how you want to layer them in order for everything to fit on the canvas.

I wasn’t crazy about the uneven spacing between the red lines and burlap color, so I decided to layer my strips to hide the top red line on each piece of webbing. This would give me nice even red/burlap spaces.

Burlap Webbing American Flag

Step 3:

Fire up that glue gun and get to work. With each strip, I glued the left side of the canvas and simply worked my way to the right, again adhering it to the side of the canvas.

You can see how I cover the top red line on each piece of webbing in the photos below.

Burlap Webbing American Flag

Step 4:

Grab your blue burlap rectangle and glue it to your flag. Since the blue burlap had bigger spaces/was more see through, I was worried that gluing the entire rectangle down would show through to the surface. Therefore, I chose to glue down just the edges of the blue fabric—it stays on there just fine.

Burlap Webbing American Flag

Step 5:

Decision making time- stars or no stars? At the moment I have no stars on my flag and I think I will keep it that way. Reason 1: I like the simplicity of the flag without the stars

Reason 2: I made several attempts to cut small stars out of good old burlap, but each ‘edge’ of the star unraveled, leaving me with a 3 or 4 pronged/misshapen star. Perhaps if I see some pre-cut burlap stars that fit the bill at a craft store I will buy them and see if I like how they look on the flag.

Burlap Webbing American Flag

I just love how this craft came out! Currently it’s on the foyer table instead of its intended shelf destination—we’ll see if it stays put.


Happy 4th of July!!


Heat Embossing 101

Embossing is fabulous—it’s the perfect way to embellish paper and turn it into something special. Have invitations to send out? Place cards to make for that fancy get-together? Gift tags to stick on those carefully selected presents? Why not emboss all of these things and add a little glamour to what you do!

You’ve all seen embossed items—today I’m going to describe heat embossing so your design is upraised from the paper. It is a very easy process that anyone can do. The following tutorial shows my mother-in-law and I making the tags for a Wishing Tree at a recent bridal shower. We got our goodies at Paper Source– be warned you will buy everything you see– I love this place!

embossed

What you need:

Paper—whatever you are creating (tags, invites, etc.)

Ink—in the colors you would like your design to be

**Pigment ink is what you need- it dries slower so you can apply the powder. VersaMark

Watermark is clear ink and is the brand that I’ve used- found at craft stores.**

Embossing Powder—in the colors you would like your design to be

Embossing Heat Tool—sold in craft stores—Walmart has one for $15

Rubber Stamp/Design of your choose

Paper/Folder- as a work surface to catch overflow powder


Step 1:

Choose your color(s) and corresponding stamps. We had a border stamp which would be black and a letter ‘G’ which would be gold.

With this in mind, we planned to use a black ink pad for the border coupled with clear embossing powder. For the ‘G’ we would use the VersaMark clear ink pad and gold embossing powder on top of the clear stamped ‘G’.

Step 2:

After stamping each paper with the border in black ink we were ready to start the embossing.

embossing

Step 3:

Using the clear ink pad we stamped the ‘G’ in the center of each oval. As it’s a clear stamp, be sure to take note of what you’ve stamped—if you lose track, you can see it if you look closely.

emboss step 2

Step 4:

After the clear ‘G’ is on the paper, sprinkle the embossing powder on top. You’ll see that it sticks to the stamp. Shake off the excess powder.

This is where it’s crucial to have a manila folder or a slightly folded piece of paper underneath. The excess powder will fall onto the paper and you can then refill your powder container every once in a while. You do not want to waste this stuff!

powdered G

Step 5:

Use your heat tool to melt the grains of powder into a smooth surface. It’s nerdy, but I think it’s kind of cool to see just how quickly it melts into your upraised design.

If you’re doing a large project (we did about 50 cards) and you have a helper, it is best to get an assembly line going. My mother-in-law stamped and passed them off to me for sprinkling/heating.

Just a note- If you don’t have a heat tool, I’ve seen online that it works with some hairdryers, but you need it to be super hot and it takes longer to do. I haven’t personally known anyone to use this method.

emboss step 6

Step 6:

Your newly embossed products are good to go! You can do really neat things with embossing, such as tone on tone, or emboss the design and then color the background only with a contrasting ink color. The possibilities are vast and it is an easy craft with a great impact.

picture1Don’t these tags look great on the Wishing Tree at the bridal shower?!

Here’s a picture of my bridal shower invitation and our seed paper wedding favors, both created by embossing:

bridal shower and wedding favorHappy Embossing!


Moss Covered Letter

Here’s another craft that I made for the bride-to-be at her shower. After the vintage garden theme was settled, I knew right away that I had to make a moss covered letter. It was the perfect fit for the theme of the shower and could also serve as home décor for the bride and groom in their new house!

Moss Covered Letter

What you need:

  • 1/4” plywood—I used leftover from my Berry T Wreath and Moss Shamrock crafts
  • Letter on paper (font of your choice)
  • Jigsaw
  • Sandpaper
  • Spray Paint- optional
  • Moss—I used sheet moss found at any craft store
  • Glue Gun
  • Burlap/ribbon

Step 1:

Choose a font for your letter. Again, since we have access to the LCD projectors at school, I used that to trace my letter onto paper. No LCD projector? Print out your letter on two pieces of paper and tape them together. Trace your letter onto your wood.

Note- I was working with a remnant piece of wood, so it was already cut into a square shape that was close to the border of my letter. You don’t want too much excess wood getting in your way as you cut.


Step 2:

Cut out your letter using the jigsaw. Use some sandpaper to smooth out the edges.


Step 3:

As with my other wood crafts, I decided to spray paint my letter in green. The moss won’t cover the sides of the letter and I wanted the wood to match.

Moss Covered Letter

Step 4:

Trace your letter onto the back of your moss sheet and carefully cut it out.

Moss Covered Letter3

Step 5:

Using your glue gun, apply your moss. Make sure you have newspaper or toweling down to catch the many pieces of shedding moss.

moss covered letter

Step 6:

Tie burlap or whatever ribbon you choose around the letter and it’s ready to hang. I think this looked just awesome on a mirror at the bridal shower.

Moss Covered LetterThis is a great craft for yourself or even as a gift!


1 2 3 4 5 6