Our good friend Jen recently tied the knot at the Visionary Art Museum in downtown Baltimore.This beautiful venue was the perfect backdrop for the vintage meets modern wedding. Her colors were a collection of muted, summery tones with a fresh, romantic feeling. Jen’s big day featured so many adorable DIYed details, we just had to share. Look at the happy couple. Doesn’t Jen look absolutely radiant?! Ben, the groom, cleaned up nicely as well. Oh and that dress…
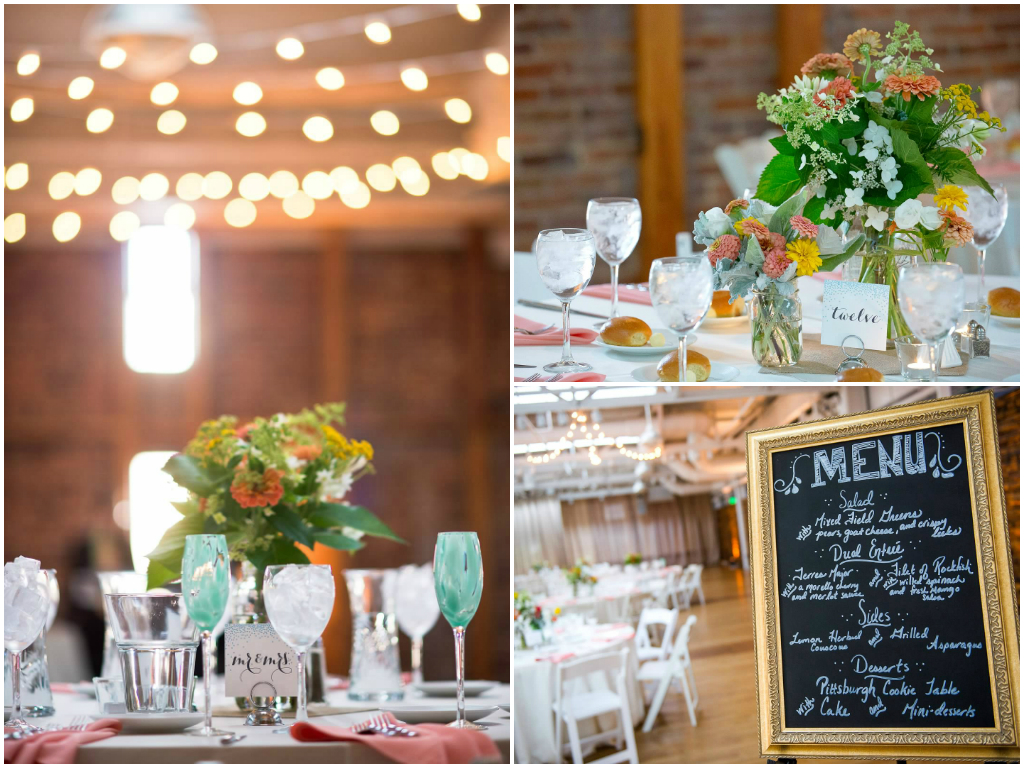
The cocktail hour and reception featured handmade pinwheel place card holders, DIYed bar and dinner menus.The couple also showcased family wedding photos dating back to the 1800s. The invitations and coordinating signature cocktail beer label were custom designed by a friend. All of the details meshed seamlessly and the result was a classically elegant look that echoed the modern appeal of the venue.
Thank you Jen and Ben for letting us share your beautiful big day! Also a shout out to Twist Photography for the gorgeous photos.
Growing up with a grandfather who was a jeweler wasn’t a bad gig. There were many hours of show and tell, and even the fortunate bonus of getting handmade jewelry for ‘life milestones’. Each item crafted by my grandpa is very special to us grandkids and we all treasure these family heirlooms. Sadly, this unique talent skipped right over me, but it certainly resonates in my sister.
We all know those girls who love the glitz and glam things in life. My sister, Michelle, is one of those girls. If it has glitter, rhinestones, or anything sparkly, it’s the thing for her. What started when she was little with bedazzling all of her clothes, has now turned into the hobby of jewelry making. True, my grandpa worked with real jewels and fine metals, but Michelle’s jewelry is nothing to brush aside. Since she is constantly making and selling jewelry, the arsenal of earrings and necklaces she has assembled is quite impressive. For her birthday, I knew that she would appreciate (and actually use) another means for her to store her creations. I may not be able to make jewelry, but I knew I could make some sort of jewelry holder.
I’m sure you’ve seen lots of ideas for jewelry storage online, so you can consider this just another one to add to the mix!
What you need:
Frame—I got mine at Hobby Lobby on super clearance
Radiator Grill/Screen
Metal cutter/shears
Spraypaint (optional)
S Hooks
Step 1:
Spray paint your frame. My sister’s room has the color scheme of a peacock feather—the walls are bright purplish pink, and the accents are golds and blues. Subdued isn’t quite a word that one associates with my sister. To go with this color scheme, I decided to spray paint the frame a deep purple color.
Step 2:
Cut your radiator grille. I found my metal screen at Home Depot. They had four patterns that came in aluminum, gold, and a bronzish color. I went with gold because Michelle already has that color as an accent in her room. I think that purple and gold are very regal colors, and Michelle always jokes that she is the queen, so it was a perfect fit!
I used some metal cutting shears and cut it down to size. You’ll notice that some of the corners are cut on an angle—this is where the little hooks are that enable you to hang it on the wall. I wasn’t sure if she wanted it horizontal or vertical on her wall, so I was sure to leave these hooks free from the screen.
The screen itself was about $30, and I certainly will be using all of the remnants to create something else—maybe some jewelry holders for myself.
Step 3:
Secure your grill onto the back of the frame. I used a stapler to do this, and it worked like a charm. Step back and admire your handiwork!
Step 4:
Place your S hooks through the holes in the screen. I chose to hold off on this step until I gave it to my sister as I didn’t know if she would use this for necklaces, bracelets, or both. We stuck the S hooks in when she knew which jewelry it would hold.
Here it is when it was all said and done and up on her crazy colored wall:
What do you think? This craft is not only practical, but couldn’t have been any easier to make. It took all of 5 minutes to physically put together. I’m looking forward to making one of my own sometime soon—although I can guarantee you it won’t be purple and gold!
Last night, I dismantled my Patriotic Mantel. Even though I had been rocking it since May, I was sad to say goodbye because its removal solidifies and marks the end of summer. And boy, do I love summer.
The night before, my oldest and I ventured downtown to marvel at The Star Spangled Spectacular fireworks display. If you remember from my Patriotic Mantel, I freakin’ love fireworks, Flag Day, and patriotic things/displays, so naturally I was quite smitten as fireworks spelling USA and replicating the American flag were displayed. After such a wondrous showcase of patriotism, I felt okay taking down my Summer/Red,White, and Blue Mantel.
To soften the blow of summer’s end, I quickly threw up my fall mantel. Some DIYs, some Dollar Tree mums, some 50% Michael‘s sunflowers, and an old clementine crate made their way onto the mantel.
That moss covered “D” has been up there for a bit this year. I guess it might be time to retire it for the year, but I do love the moss and burlap textures up on the mantel.
Yes, that’s a chalkboard banner.Some MDF, a scroll saw or jigsaw, some chalkboard paint, and you’re in business!
It’s a pretty simple and straight-forward mantel, and I’m okay with that. I’m also okay with the paper towel roll cornhusk courtesy of my oldest.
The glittery leaves are cheap leaves dipped in glue, doused in glitter, and glued to sticks.
Along with this mantel, I started decking our dining room out with some Fall/Halloween themed decor, which has managed to distract me from the chilly reality that summer is fading away just like my glorious tan. <sigh>


 The cocktail hour and reception featured handmade pinwheel place card holders, DIYed bar and dinner menus.The couple also showcased family wedding photos dating back to the 1800s. The invitations and coordinating signature


 Thank you Jen and Ben for letting us share your beautiful big day! Also a shout out to Twist Photography for the gorgeous photos.


