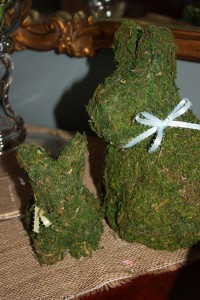
Okay, that’s not true. Burlap will always be #1 in my heart. I mean, come on, I try to use it everywhere like in my Easy Burlap Bubble Wreath, and Kiss Me, I’m Burlap Bunting, but Moss might be trending in my house this Spring. It started with letters, and now little bunnies. Lisa even made a lucky shamrock.
These little moss covered bunnies are cute and super easy to recreate. Trust me, I’m the queen of quick and easy crafts.
This is a story about a sweater, two boys, and a pillow.
The last time I told a story about a sweater, it was a disaster. If you need to feel better about yourself and your crafting abilities, check out that other sweater story here.
Unlike that pitiful sweater story, this is a happy story.
A sweet friend of my husband’s and mine gave our first born a handsome sweater. It was nautical, cotton, and little, so it was love at first sight.
I loved that sweater. My first wore it (and rocked it).
And my second little guy wore it (and rocked it).
Totally owning that sweater.
But then, as all little boys do, they grew. And soon, that gorgeous sweater was a belly sweater/crop top. As much as I think my guys’ little bellies are cute, I knew it was time to retire the sweater.Now usually, when an article of clothing becomes too small for my guys, I pass it on to the next lucky mom and boy, but not this sweater. I held on to that sweater for months. I just could not part with it. Nope, that lovely lobster sweater was staying with me.
Long story short, that little lobster sweater is not a pillow
It’s cute, but not as cute as my boys wearing it, but that’s okay.
So the next time, a sweater or shirt is too precious to pass on, make it a pillow.
Share the post "Rock Lobster Pillow (Formally known as The Lobster Sweater)"
You all know how I love a fast and easy craft, right? Well, this Boxwood Bunny Wreath is not. Maybe I am being a little overly dramatic. It’s not incredibly difficult, but it is not remarkably fast. This is definitely not like the Burlap Bubble Wreath, which took all of 15 minutes. Nope, this little bunny required a little more time. You are going to have to devote ONE WHOLE HOUR to this little Spring cutie. I know, right. One whole hour. Ain’t nobody got time for that…
Just kidding. Everyone has time for this Boxwood Bunny Wreath because it’s cute and cheap. If my crafts aren’t going to be quick and easy, they better at least be cheap. Apparently, my ideal crafts are floozies. Yup, I just personified my crafts. Things just got weird.
What you’ll need:
- Three Wire Hangers
- Greenery- mine were from Joann’s (thanks, Carrie!)- 3 bunches
I wanted boxwood greenery, but I couldn’t find any. I guess if you want to get technical, this isn’t a boxwood bunny wreath, technically. But, Honey Badger Grace don’t care (I’m full of timely–read: not timely– virile video allusions today, aren’t I?)
-Floral Wire
-Burlap Ribbon ( you know I had to feed my burlap addiction) or any other ribbon you like
-Wire cutters
-Pliers
What you’ll do:
- Shape the bunny’s body.
I shaped my bunny’s body by using two pots. I cut the hook off of the hanger and twisted it around two different sized bowls. For those who like precise measurements, my bunny’s head has a 6 inch diameter and the body is about 8. You will use the pliers to secure the circles.
-Shape the ears
For the ears, I found that the shoulders of the hanger make perfect bunny ears, so I made four cuts on that hanger. This was my least favorite part of securing the ears to the head. I just used some brute force to get it done.
-Take apart the greens, so you have little sprigs.
I just cut the sprigs off the stem, which was easy since the sprigs were made of plastic and not wire.
-Tie/wrap the sprigs on the bunny form with your floral wire.
I made my sprigs go in the same direction. I also found it easiest to cut a long piece of floral wire and just start wrapping the wiring around the sprigs. Nothing scientific. It was definitely a learning curve here. This is your longest step. You’ll need to finesse the leaves in case your wire holds all the leaves down.
-Put a bow on it.
- Hang it.
I broke it down for you with a series of pictures.
Boxwood Bunny Wreath
I think she’s pretty cute even though it wasn’t the quickest craft I’ve ever whipped up.


