It’s that time of the year. Sweet, sweet Summer is ending, and some of us are gearing up for the start of the new school year.Because I am one of those sickos, who admittedly has an odd fervor for the beginning of the school year (and school in general), I became a teacher, so I could make sure I never have to let go of the back-to-school jitters (that and office supplies. I love office supplies). I, also, enjoy singing Billy Madison’s “Back to School” song on my first day of school.
In the spirit of the back-to-school season, I am going to share with you an easy and cute alphabet practice activity. My oldest is one year away from kindergarten, and working on our letters is the big push around the house.
This Alphabet Practice Activity is great because it does not just focus on a letter, but it also hones fine motor skills.
Here’s what you’ll need:
- White School Glue
- Pom Poms- assorted sizes and colors
- Cardstock or any paper
- a sharpie or marker
Here’s what you’ll do:
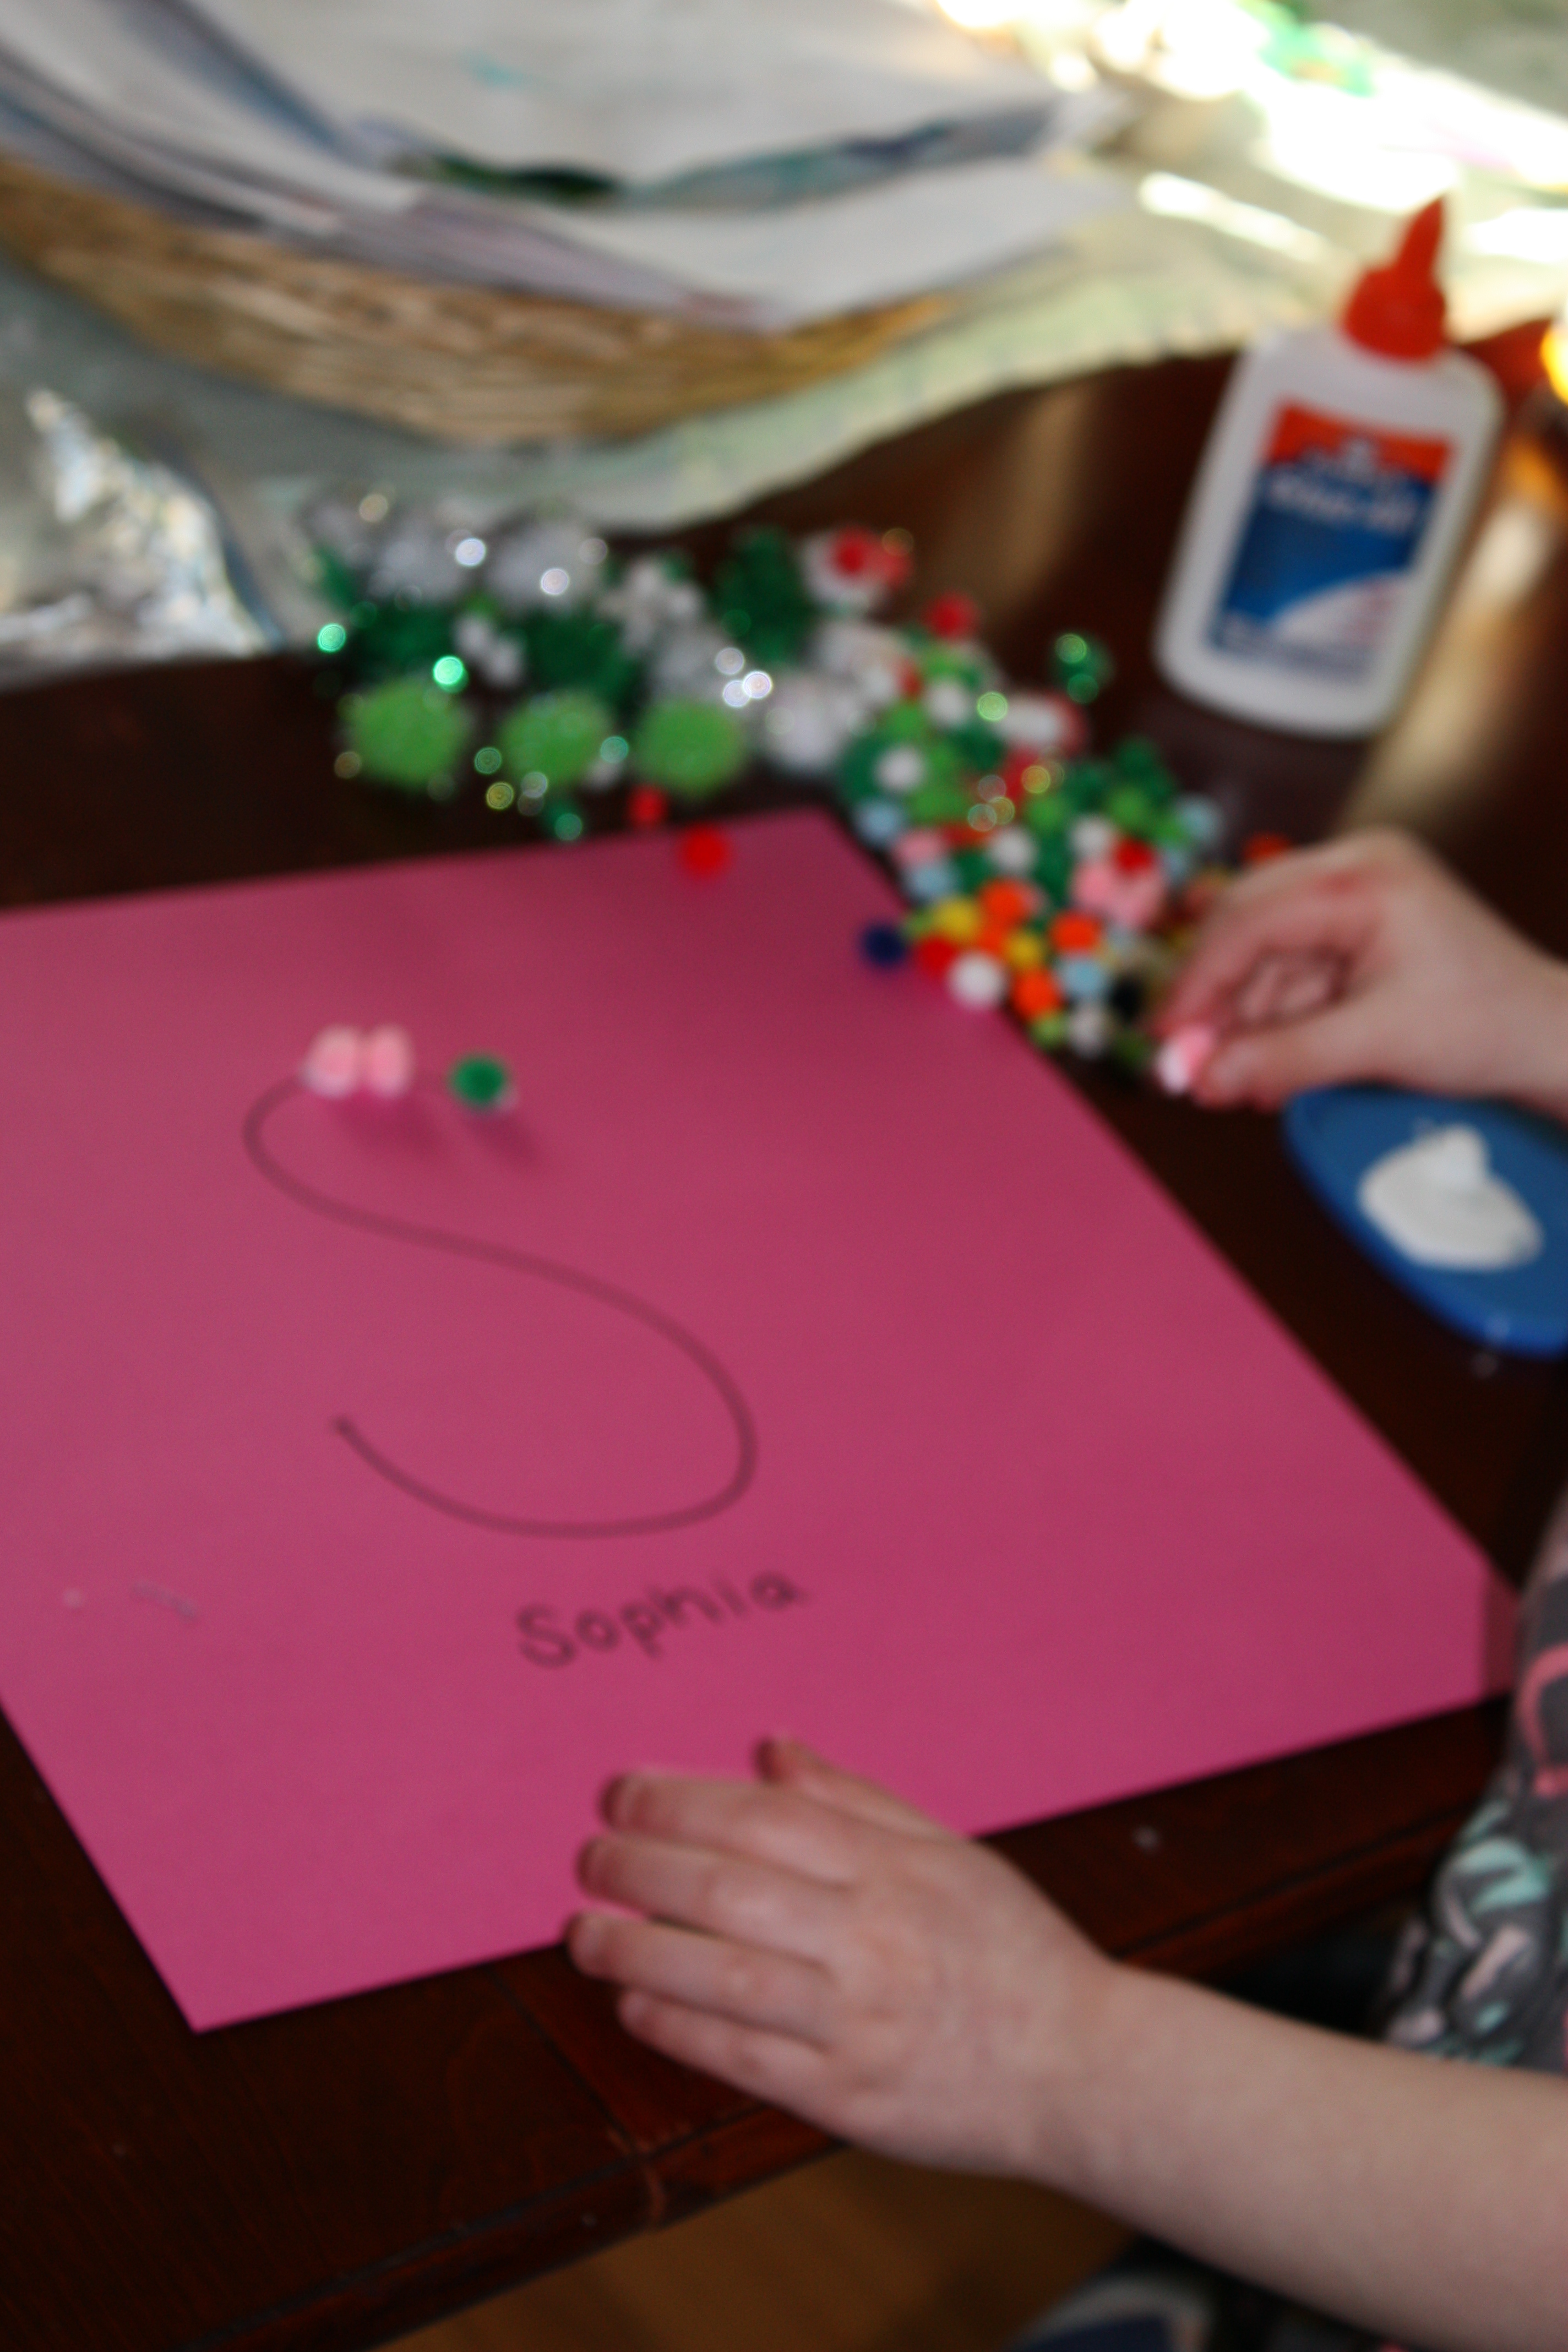
- Draw a fairly large letter. Any letter. For this, I did first initials, and wrote the full name under the letter.
- Place some glue on a plate for easy dipping.
- Open up Pom-Poms.
- Model dipping a pom-pom into the glue and placing it on the outline of the letter.
- Let your little one(s) have at it.
BONUS: Want to up the learning ante? Talk about patterns and colors while arranging the pom-poms.
Here is my son’s and Sophia’s, my good friend’s daughter, letters.
For Sophia’s letter, I framed hers, so she could hang it in her room- alphabet practice activity and room decor–score!
I’m eager to hear of some other activities you use to practice the alphabet!
I love a good wreath. and “If you don’t know, now you know,…. ” ( please read/sing this to the tune of “Juicy”).
And if you saw my You’re a Grand Ole Flag Mantel, you know that I have a thing for anything patriotic. To me, baseball is pretty patriotic. After all, it is America’s Pastime. So, an easy baseball wreath is right up my patriotic wreath-lovin’ alley.
There are some other tutorials on how to make a baseball wreath, but almost all of them suggest drilling holes in the balls, and using a wire hanger. I decided this was not a viable option because the wire will eventually sag, and the wreath will, too.
This one’s a pretty easy wreath to replicate, but you are going to need a whole lot of glue to make this one.
- Glue the baseballs to the wire frame. The wreath form has a “cupped” side (like a channel) and a flat side. You want to place the balls in the cupped/channel side (basically, the wreath form side that will hold the balls). I found it helpful to first secure the baseballs to the form with hot glue, and then flip the wreath over with the wire facing up, and fortify it with Gorilla Glue. hot glue, or Caulk. Don’t be shy with the adhesive, and don’t worry what it looks like because no one will see the back of the wreath.
- Wrap burlap around the wreath- I wanted my burlap to be a little rustic, so I used scraps and pulled some strands out, so it would fray a bit. The burlap also helps hide the wreath form while securing the balls a bit more.
- Wrap some decorative ribbon to the wreath.
- Hang it!
There’s something about the look of used baseballs that I really just love. Am I am the only one?
Share the post "Take Me Out to the Ball Game Baseball Wreath"
The largest project my husband and I have done in our house is the built in entertainment center for our first floor. It took lots of brainstorming and planning to make this from scratch, but we are beyond thrilled with the results.
After it went up, we quickly filled it with books and some baubles that went with our sailing/nautical-lite theme. As the months went by, I found myself tinkering with the items on the shelves as well as the layout… I was just not pleased with how it looked.
Here’s a close up of the shelves— they were too cluttered/a bit too full for my liking. We used a textured wallpaper (similar to grass cloth) for the back of the bookshelves—I wish it photographed more like it actually looks! Forgive the TV wires… we haven’t put them through the cabinets yet!
After de-cluttering and shifting some things around, I found a layout that I could live with.
Now that I liked how the shelves were more open, I wanted to make the whole thing blend together. I was not a fan of the mishmash of cover colors and wanted to do a subtle theme of blues, greens, and creams—this would match much better with the rest of the décor in the room.
My husband thought I was insane when I told him I was going to recover the books. When I removed the paper cover, some of the hardcover books were already blue or cream, so that worked to my advantage. It was mostly the paperbacks that I had to deal with.
As I wanted to print on the covers, I referenced/modified this in depth tutorial from the blog The Precious Little Things in Life.
Here’s how I covered my books.
What you need:
Books
Paper (I found some large paper at Hobby Lobby and used brown shipping paper that I
already had leftover from Christmas)
Scissors
Tape
Measuring Tape
Ruler
Printer
Microsoft Word
Step 1:
First I had to determine what color I wanted each book to be. I did a rough sketch of our books in the layout that I liked and then assigned each book that was getting covered a color.
Step 2:
Line up your books and group those of the same height together. Under each category of height, I listed the individual measurements for those titles.
Step 3:
Measure your books. You need two measurements, the height of the book, which you already measured, and the book’s circumference. Find the book’s circumference by placing the lip of your measuring tape on the backside of the book, wrap around the spine, and across the front cover.
When you have all of these written down, you are ready to start covering your books. It would have been lovely if I had books that were the same height and circumferences, but alas every book was slightly different. This would have saved me some time cutting out the paper (I could have cut multiple sheets at once). Maybe you will be luckier than I was.
Step 4:
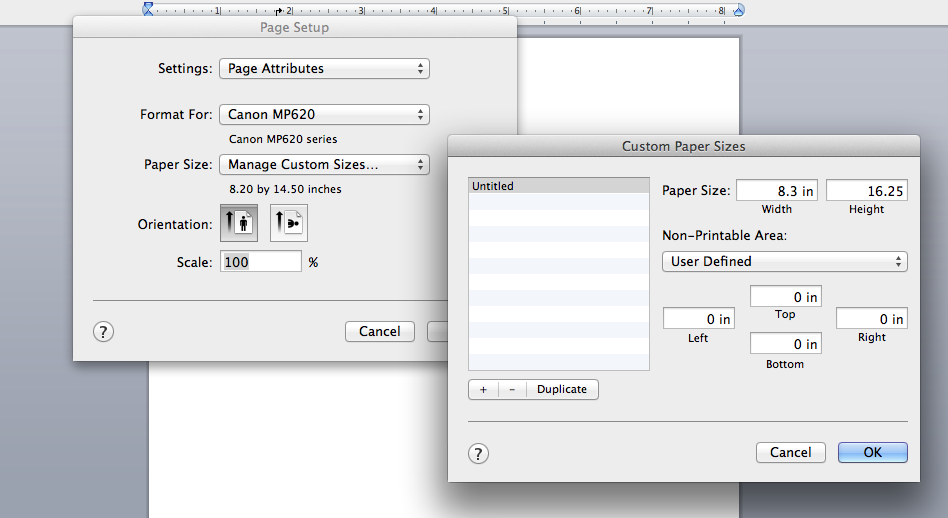
These directions might vary ever so slightly for you, as I was using Microsoft Word 2011 for Mac. In Microsoft Word, navigate to Page Set Up.
In the Page Set Up box, find Paper Size, and go to Manage Custom Sizes—this is where you will type in your measurements to ensure a perfect fit.
In the Manage Custom Sizes box, the Width box is where you will type the height of the book. The Height box is where you will then type the circumference measurement. You can see this in the picture below, as well as the fact that I chose to make my top, bottom, left, and right margins 0.
Your page will now look tall and narrow—this is what you want in order to print the title.
Step 5:
Now that you know your page dimensions, you’re ready to cut your paper. Cut your paper to the same measurements that you typed in the Width and Height boxes. Once your paper is cut, put it in your printer (I had to use the manual feed tray in the back of mine).
Step 6:
You’re almost ready to type your book title onto the spine of your book cover.
You can vary the fonts and sizes to your liking—I chose to keep my font the same for every book. The only thing I changed was the font size. Some of my book spines were 2 inches while others were ¼ inch, therefore I used size 30 font for the bigger titles and size 14 font for the smaller. I printed out one regular old page of a few titles with font sizes of 14, 18, 22, 26, 30. I then held up this sheet to the books when I was ready to type the titles in order to eyeball which size was the best fit.
Step 7:
Remember where you typed the circumference of the book into the Height box? In my earlier photo it was 16.25. In order to type your title perfectly centered on your book cover, you need to take your circumference measurement and divide it by 2.
For example, 16.25/2 = 8.125. Hit enter until you bring your cursor down to roughly 8.125. So long as you are in the ballpark of that number, you will be fine.
Center your cursor, and type in your title and author.
Step 8:
With your paper in the printer and title typed up, go ahead and print.
Lay your book on the printed paper and pull until the title is centered on the spine.
Make a crease where the front/back covers end so you know where to fold your paper. Tape the cover in place.
Step 9: (Optional)
I decided to lightly pinch/crease the spine so there was more definition around the edges.
So there you have it– freshly covered books to go with the color scheme of your choice. Here are a few shots of the books on the shelves. (Pardon the wonky lighting in a few of the photos).
Although it took a while, I enjoyed doing this project. It was kind of like a grown up version of covering your textbooks back in middle school!