Posts Tagged ‘upcycle’

DIY Burlap Bulletin Board

DSC02405    

When we moved in our house five years ago, I envisioned a large bulletin board above the butcher block to keep things organized. Instead we’ve been living with a cluttered corner on our kitchen counter. When the pile got too high, we would “binge organize” and purge papers till the pile is down to an acceptable size. Needless to say, this DIY burlap bulletin board is long overdue. I’ve seen similar products at Ballard Design, Pottery Barn and Etsy. This one was made with a fraction of the cost.

Materials:

DSC02320

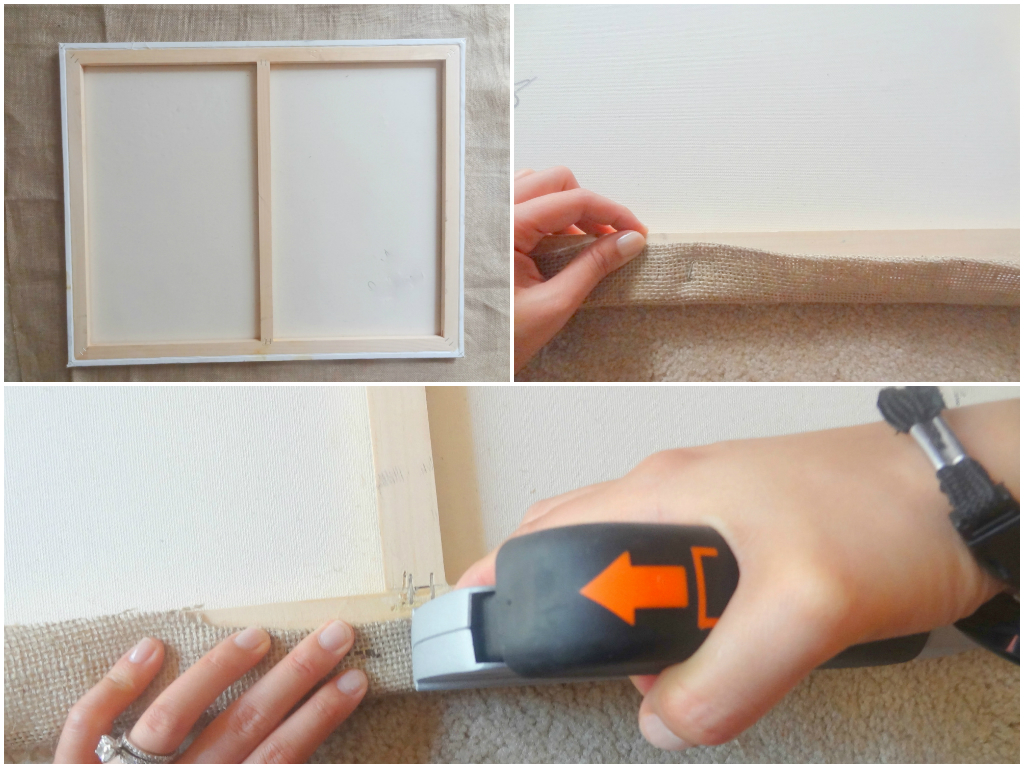
  • Stretched canvas (I upcycled a used canvas from the art department at school)
  • Burlap (mine is from the fabulous burlapfabric.com)
  • Upholstery tacks
  • Cork tiles
  • Hot glue gun
  • Rubber hammer
  • Nail gun

Step 1: Trim the burlap to size. I cut mine to be 10 inches larger than the canvas dimensions. You may need to adjust the allowance depending on the thickness of your canvas.

Step 2: Center the canvas on top of the fabric. Start at the center of one side; wrap the burlap around the frame then staple. Continue this process towards the corners. Once the first side is stapled, move on to the opposite side. Be sure to pull the burlap taught. If you prefer a clean edge, fold the raw edges in first then staple like I did here.

burlap bulletin 1

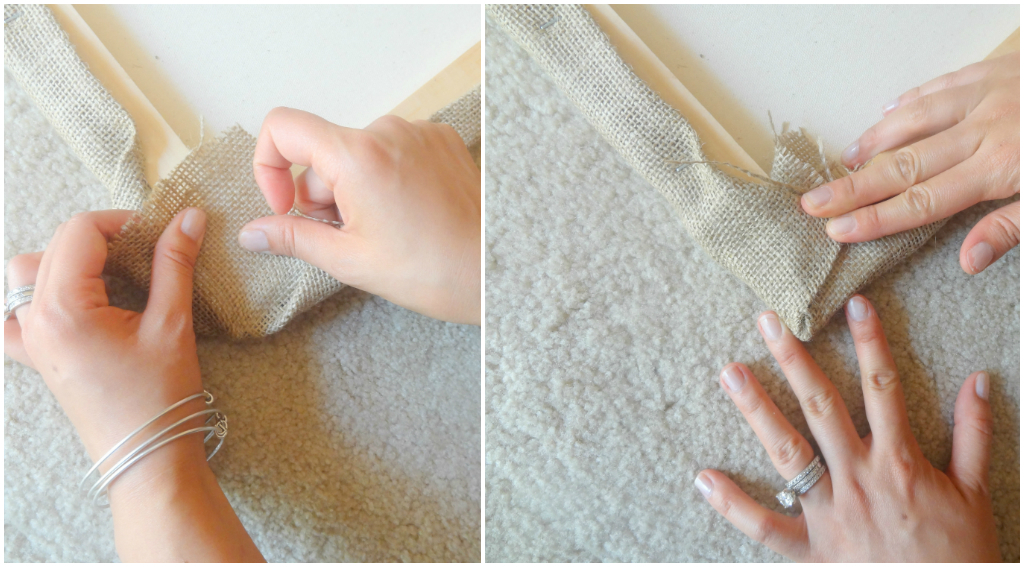
Step 3: Wrap the corners, fold as neatly as you can. The material here will be a bit bulky. Don’t be afraid to shoot several staples to hold it in place.

burlap bulletin 2

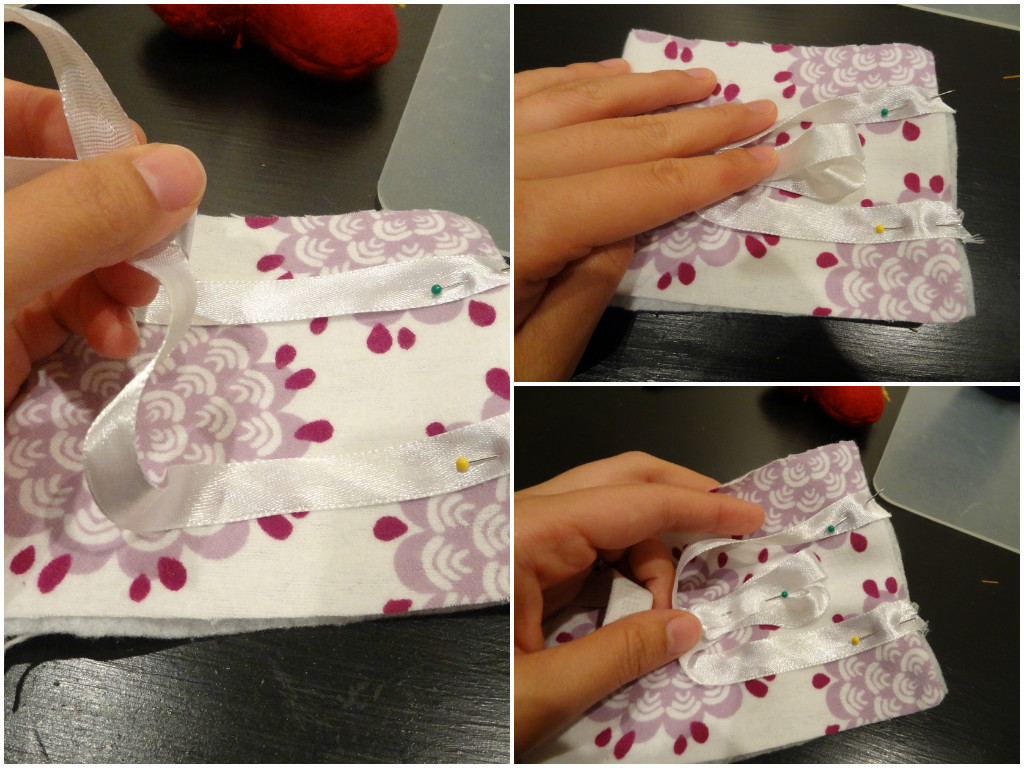
Step 4 (optional): Cut a piece of burlap with a finished edge of desired width. Staple it to the bottom edge of the board to create a pocket. Originally, I planned to use webbing but the green trim the burlap came with was too cute not to feature.

burlap bulletin 3

Step 5: Place upholstery tacks along the edges with even spacing. I used a measuring tape as a guide to help with spacing and straightness. Given the tacks a good press so they stay in place, then hammer in with a rubber hammer. If you like a more distressed look, use a regular hammer instead.

burlap bulletin 4

Step 6: Place the cork tiles on the back of the canvas, trim the excess with scissors. Secure in place with hot glue.

 burlap bulletin 5

I’m really happy with how the bulletin board turned out. I don’t know why I waited this long to tackle this project. Do you have cluttered corners or piles of paper you’re dying to organize? Do you have any tips on to keep mail/reminders/coupons organized?

burlap bulletin board 7

DIY Door Silencer

These days L is obsessed with opening and closing doors. OBSESSED!! I can just hear my mom now “well, why don’t you just keep all your doors closed”? We try, but the girl is fast, like Flash fast. As soon we crack a door she’s there. I fear for her little fingers every time she touches a door. So I decided to DIY a few door silencers to prevent squished fingers. Their intended purpose is to close doors quietly for sleeping babies but the padding will also prevent doors from slamming. They were very easy to sew, literally a few rectangles. Each one took about five minutes.

DIY silencer 1

Materials (for 1):

  • 1/8 yard fabric (I used scrap fabric from other projects)
  • 5″ x 3″ batting or felt (use another layer or two of fabric if you don’t have these)
  • two 2” long elastic or two 13” long ribbon

DIY silencer materials

*If you don’t have any scrap fabric, upcycle some old clothes.

Step 1:

Cut two 5” x 3” rectangles from your fabric. Cut one rectangle of the same size from your padding. I eyeballed my door lock and this measurement seemed appropriate. Be sure to measure yours if you have something other than the standard lock. I used 2 different fabrics for the front and back.

DIY silencer

Step 2:

Place one of the fabric rectangles on top of the padding (wrong side down). Make a U shape with an elastic piece. Pin each end of the U to the shorter side of the rectangle. Make sure the elastic U lays on the fabric and not outward like a handle.

DIY door silencer2

*If you are using ribbon, fold the excess neatly and pin to the center of the rectangle.

DIY door silencer3

Step 3:

Place the second fabric rectangle on top of the first one, right sides together. Pin all the way around.

DIY door silencer

Step 4:

Sew all the way around the rectangle leaving a small opening. Be sure to back stitch on the elastic/ribbon for a stronger hold.

DIY door silencer

Step 5:

Turn your rectangle inside out from the opening.

DIY door silencer

Step 6:

Sew the opening shut with a blind stitch. Ta-da! If you are feeling fancy, do step 7.

*If you are using ribbon, cut each loop in half and trim the ends.

Step 7 (optional):

Do a top stitch all around for a decorative touch. If you are feeling super fancy, I recommend ironing the seams before top stitching.

DIY door silencer

I like the look of the ribbon tie ones better, but the elastic ones are easier to hook on and off. Now that these are on the doors I don’t cringe as much when L is pushing a door shut. I have a feeling these will also come in handy during the moody, back talking teenage years.

silencer 4

silencer 5

Now my husband seems to think these are unnecessary. Your thoughts? Do you think they make a practical baby shower gift? Do your children have any strange obsessions?

A Mother’s Day DIY

Take one step into any store, you’ll know it’s Mother’s Day weekend. I always like to browse the greeting card section this time of the year to read the sweet little poems, punny jokes and clever sayings. There are so many options!!! It is the “mother of all mail days” after all (quick, name that TV show). Kevin James does a pretty accurate depiction of how I pick out a card.

Quite a few of my friends are celebrating their very first Mother’s Day this Sunday. I was all excited to pick out a few Mother’s Day cards during a trip to Target, but L wanted no part of it. Sitting in a shopping cart that’s not moving is not her thing. Anyway, I took advantage of nap time one afternoon and made a few cards for friends and family to commemorate the special day.

Mother's Day card 1

mother's day DIY card 2  mother's day diy card 3

The front of each card is personalized with dates and a message. The back reads “Making the decision to have a child is momentous. It is to decide forever to have your heart go walking around outside your body”~Elizabeth Stone.

mother's day diy front  mother's day diy back

This Mother’s Day DIY didn’t require a lot of materials. Here is what I used:

Mother's Day DIY Materials

  • 2 sheets of 12”x18” brown construction paper (made 6 cards)
  • 2 packs of decorative flowers (found at scrapbook section, bought 3 used 2)
  • 1 pack of green embroidery floss
  • 6 library book cards (thanks to media center book weeding!)
  • a few green paint chips
  • a piece of news paper
  • ribbons

The inspiration for the cards came from here. They were super easy to make thanks to my trusty hot glue gun and the detailed instructional video. I changed the design a bit and adapted a few steps to work with the tools/materials I had. I also cheated with the flowers. Instead of hand stamp/emboss each flower, suggested by the video, I used store bought crepe paper flowers. I guess I should change the title to A Mother’s Day Semi-DIY.

mother's day diy card 5

Happy Mother’s Day to all the mommas out there!

1 2